Building the Linux kernel for dedicated hardware VMs
My GitHub repository fedora-acs-override has been used to talk about many other topics - benchmarking build times, showing how matrix builds work in Actions, and tour of how building software for Linux has changed over the years. However, I’ve never talked much about why I spent hours putting this all together to begin with. I don’t compile my own kernel just for fun - so let’s talk about why this patch exists, what it solves, and step-by-step how to build it and use it.
Looking for the repository? It’s here - some-natalie/fedora-acs-override
Why?
Before there was commercial off-the-shelf hardware to support AI/ML training and other GPU intensive workloads, it wasn’t easy to separate identical hardware for shared workloads - especially for fast-moving experimental work. It’s the same general idea for network interfaces (LAN, WAN, modems, etc.) or anything else you may want to address individually over PCIe . Bare-metal (type 1) hypervisors can use this patch to preserve near-native performance and isolation, while consolidating hardware.
No really, why?
I hate dual-booting between Windows and Linux - but I want to play some Windows-exclusive games. Windows isn’t a very good neighbor, either. It’s consistently rewriting the boot partition, removing the ability to boot into anything else. It can’t read Linux data partitions and Linux support of NTFS file systems hasn’t always been a delightful experience either.
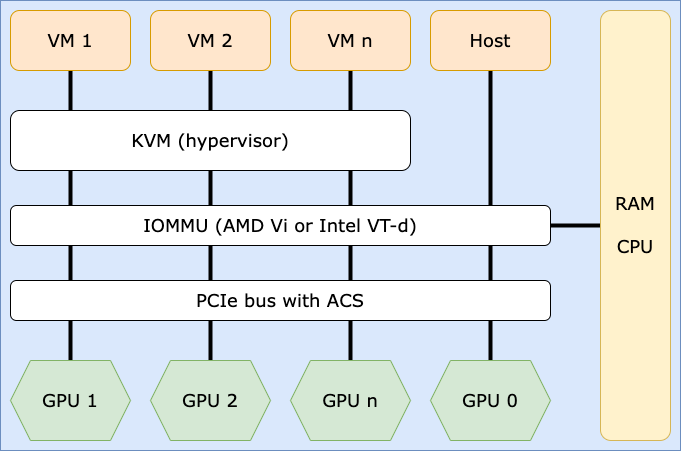
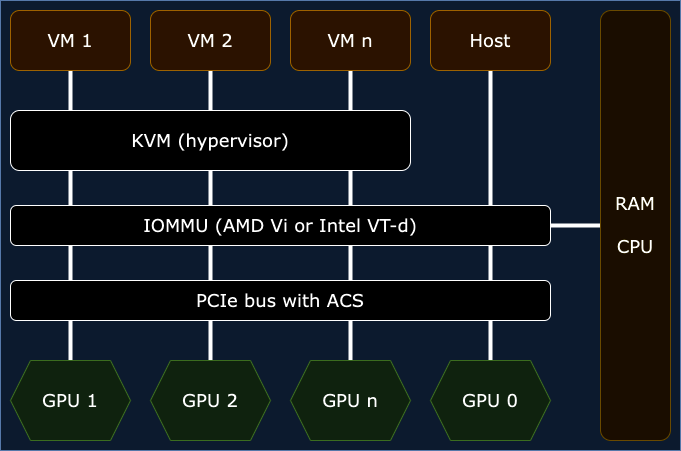
To solve for that, my desktop is a type 1 hypervisor . It’s built from off-the-shelf hardware. This configuration allows me to use my normal Linux desktop applications for browsing the web, developing software, and generally being comfortable with my computer - while simultaneously allowing bare-metal performance for playing games within a VM by giving it real hardware to run on. It has one CPU socket, plenty of RAM, and two (identical) GPUs. It also has one monitor on each video card, two keyboards, and two mice. You’d have to be told there isn’t a second tower somewhere out of sight. By default, the kernel does the sensible thing and uses the GPUs together as one (but sees both discretely).1
It’s convenient and straightforward to use … until it isn’t! There’s no pre-built kernel using this patch from a trustworthy source in Fedora that I found when I needed this patch.2 Good thing it isn’t hard to build the Linux kernel from source and manage RPMs! 😉
What’s going on?
At a very high level, the patch in this repository adds some flexibility to how the kernel handles PCIe hardware. PCIe 2.0 introduced a really neat standard called Access Control Services (ACS). This patch enables it for generic hardware, overriding what the manufacture and/or device driver has specified for any specific piece of hardware. Once you build and install it, you can then split up hardware and allocate it to virtual machines in KVM.
We’re going to do the following:
- Add the patch to the Linux kernel and compile it as an RPM to install (and re-use across entire fleets of servers if needed). (link)
- Split the hardware up using IOMMU groups (input/output memory management units) and persist these settings across kernel versions and reboots. (link)
- Set up our virtual machine. (link)
Here’s the end goal:
If you want to go deep into the what and how of IOMMU groups, PCIe standards, and more, please bump down to the resources section for fabulous links to learn more. 📚
Security time
So … if it’s so good, why was it rejected from the main Linux kernel?
This workaround to forcibly override device groups in memory can increase the risk of system instability and some pretty ugly security problems. We’re telling the machine that two (or more) devices are isolated when they may not really be. Without the hardware vendor supporting this properly, it’s difficult to be sure that these devices aren’t truly sharing memory or address space. Devices that properly isolate IOMMU groupings in memory don’t need this - it’s an increasing part of the market share now too.
tl;dr - this is probably fine for experimentation, development work, home labs, etc. - just don’t put this in enterprise production usage without thoroughly understanding what you’re doing and why. 💖
Build the kernel from source

This package is maintained by me for Fedora , the community distribution that feeds Red Hat . I’ve been a Fedora user for over 15 years and am not too interested in distro-hopping these days. It should still work (maybe with a little modification) to other RPM-based distributions like Red Hat Enterprise Linux and various rebuilds of it, SuSE and derivatives, etc.
There is no yum repository for this package (yet?). Feel free to download the latest build artifact from GitHub Actions to use yourself, though!
Prerequisites
- Fedora 38 (latest as of writing)
- Desktop computer or server with
- Two or more identical PCIe graphics cards3
- Motherboard with either
- Intel 200 series chipset (Union Point) or newer
- AMD-Vi or Ryzen chipset or newer
- A fresh backup of your data (just in case)
If you are using the proprietary nVidia drivers for their graphics card, add the RPM Fusion community repository. They’re in the nonfree collection. This should also work with other drivers and hardware, but I’m only showing off the stuff I can test and use.
1
2
3

sudo dnf install \
    https://download1.rpmfusion.org/free/fedora/rpmfusion-free-release-$(rpm -E %fedora).noarch.rpm \
    https://download1.rpmfusion.org/nonfree/fedora/rpmfusion-nonfree-release-$(rpm -E %fedora).noarch.rpm
A quick note about package integrity w/ RPMs - all of the packages in their repositories are signed with the GPG keys available here . Make sure the keys presented by DNF match the keys on that site for your version of Fedora.
Set up your build environment
Install the dependencies needed to start building your own kernel.
1

sudo dnf install fedpkg fedora-packager rpmdevtools ncurses-devel pesign bpftool
Here’s a bit about what each of these packages does:
-
fedpkgis a wrapper for working withdist-git, which we’re not really going to use directly but is still a build requirement (example version). -
fedora-packageris another requirement we don’t need to dive too deep into. It provides some config files and additional RPM utilities useful for sending packages upstream to the main Fedora project (example version). -
rpmdevtoolsgives us a bunch of handy scripts for working with RPM files, including the one we’ll use in our next step (example version). -
ncurses-develis the development libraries forncurses, the popular text based UI framework. It providespkgconfig(example version). -
pesignprovides the mechanism to sign UEFI boot images (example version). -
bpftoolis part ofkernel-tools, giving us the ability to interact with eBPF utilities. There’s not much we’ll need to do with this now, though (example version).
Set up your home build directory (if you haven’t ever built any RPMs before). This creates the expected directory structure for building and distributing RPM packages. If you’re interested in what each directory is for, there’s much more to learn about RPM packaging in Red Hat’s documentation . This is about all we need to know for now, though.
1
2
3
4
5
6
7
8
9
10
11

$ rpmdev-setuptree

$ tree ~/rpmbuild/
/home/natalie/rpmbuild/
├── BUILD
├── RPMS
├── SOURCES
├── SPECS
└── SRPMS

6 directories, 0 files
Make sure that directory has plenty of file system space available to it! Last I checked, this will easily consume 50+ GB of space per kernel version.
Figure out what version of the kernel you’re running to use in the next steps. This should print the version number out to the command line. In our case, it’s 6.2.15-300 as the latest version.
1

dnf list kernel | grep -Eo '[0-9]\.[0-9]+\.[0-9]+-[0-9]+.fc[0-9][0-9]'
Build the kernel RPMs
Download and install the kernel source RPMs, then finish installing dependencies. koji is the command line tool for interacting with Fedora’s build infrastructure. It’s downloading the source code for that version of the kernel that we’re going to modify. Next, we’re installing it to the filesystem we created in step 3. Note we’re not using sudo - it’s installing in our home directory as our regular non-admin user. The last line has dnf build all dependencies needed in the kernel.spec file.
1
2
3
4

koji download-build --arch=src kernel-6.2.15-300.fc38.src.rpm
rpm -Uvh kernel-6.2.15-300.fc38.src.rpm
cd rpmbuild/SPECS/
sudo dnf builddep kernel.spec
Add the ACS patch (link ) as ~/rpmbuild/SOURCES/add-acs-override.patch. This file doesn’t change too often, but when it does, it’s almost always line numbers in the patch file. 4
1

curl -o ~/rpmbuild/SOURCES/add-acs-override.patch https://raw.githubusercontent.com/some-natalie/fedora-acs-override/main/acs/add-acs-override.patch
Edit the spec file
Spec files (documentation ) are the cookbook that declares everything about how to build the finished code - declaring build and runtime dependencies, patch application, build arguments and flags that go into the specified compiler, CPU architectures, and more. Think of it like a Dockerfile - but for (usually) compiled, non-containerized software. It’s less complicated and a bit more abstract than a makefile, but also a lot more flexible to produce multiple builds from a single file. We’ll change a few values in this file in one of the next steps.
Edit ~/rpmbuild/SPECS/kernel.spec to set the build ID and add the patch. Since each release of the spec file could change, it’s not much help giving line numbers, but these should all be near the top of the file.
To set the build ID, add these two lines near the top of the spec file with the other release information. This gives us human-readable name to signify that this kernel build is not the normal one.
1
2

# Set buildid
%define buildid .acs
To add the patch, add the two lines below to the spec file in the section for patches (usually right below the sources). The exact number of the patch here isn’t too important. It does specify the order of application (lower patches applied first), but this is good to be applied last.
1
2

# ACS override patch
Patch1000: add-acs-override.patch
Then tell it to apply the patch in the prep section. It will be below the ApplyOptionalPatch() function definition, normally right above the # END OF PATCH APPLICATIONS comment.
1

ApplyOptionalPatch add-acs-override.patch
Compile the kernel
Compile! This takes a long time . I wrote a lot about this here if you’re interested in speeding this up. ⏳
1

rpmbuild -bb kernel.spec
Install the new RPMs
Now install the new packages with dnf to make the compiled kernel available to use.
1
2

cd ~/rpmbuild/RPMS/x86_64
sudo dnf localinstall *.rpm
You should now have at least the following packages installed:
kernel,kernel-core,kernel-devel,kernel-modules, andkernel-modules-extra.
Update and reboot to use them. You may need to select the correct kernel in GRUB - good thing we added .acs. in the name to make that easy! 🎉
1
2
3

sudo dnf clean all
sudo dnf update -y
sudo reboot
Separate the hardware at boot
Now that we’ve allowed the kernel to address the hardware separately, let’s make sure it stays this way. We’re going to install our virtual machine UI, remove the old video driver, and do some more fun boot stuff to make sure it persists.
Identify the devices
Figure out which devices we’ll need to separate. We’ll need the device IDs later on. The script is kept here and runs with sudo privileges, printing out each IOMMU group and devices inside it. In my case, it’s 0000:02:00.0 10de:1c82 and 0000:02:00.1 10de:0fb9 - the graphics and sound devices on my second graphics card.
1
2
3
4
5
6
7
8

#!/bin/bash
shopt -s nullglob
for g in /sys/kernel/iommu_groups/*; do
    echo "IOMMU Group ${g##*/}:"
    for d in "$g"/devices/*; do
        echo -e "\t$(lspci -nns "${d##*/}")"
    done;
done;
Install the hypervisor software
Install virtualization software and add yourself to the user group. This installs libvirt, the virtual machine manager GUI, and other handy interfaces to KVM.
1
2
3

sudo dnf install @virtualization
sudo usermod -G libvirt -a $(whoami)
sudo usermod -G kvm -a $(whoami)
Edit /etc/modprobe.d/kvm.conf. These two lines are commented out due to stability concerns, removing the CPU’s nested virtualization extensions from the virtual machines created by KVM. I’ve always separated my nested virtualization workloads from bare-metal hypervisor workloads, but your milage may vary here. I don’t know if this is still as much of a concern as it once was when I’d first put this together.
1
2

#options kvm_intel nested=1
#options kvm_amd nested=1
Deal with host drivers
Install (proprietary) nVidia drivers and remove/blacklist (open source) nouveau drivers on the host.
Note that this isn’t strictly necessary. You can separate hardware with nouveau, other graphics chips and drivers, etc. - just make sure you only have one set of drivers installed for your graphics card on the host so as to only use the intended one.
1
2
3
4
5

sudo su -
dnf install xorg-x11-drv-nvidia akmod-nvidia "kernel-devel-uname-r == $(uname -r)" xorg-x11-drv-nvidia-cuda vulkan vdpauinfo libva-vdpau-driver libva-utils
dnf remove *nouveau*
echo "blacklist nouveau" >> /etc/modprobe.d/blacklist.conf
sudo reboot
After that reboot, verify that the correct drivers are installed correctly and that the other drivers are fully removed. For me, this means the following:
1
2

lsmod | grep nouveau   # This should display nothing
lsmod | grep nvidia    # This should display at least a couple things
Make these changes persistent
These are numbered because it’s really important to follow them in order.
-
Edit
/etc/default/grubto enable IOMMU, blacklist nouveau, and load the vfio-pci stub driver for the card we’re going to pass through to a virtual machine before any other driver.In simple terms, GRUB has a 2 phase boot. The first one loads the initial image into RAM (called a ram drive), which happens after the BIOS has figured out what hardware is attached and where, and it should be invisible to users. The goal at this phase is to locate the drives to boot from, pass through any arguments needed, and have a very minimal recovery environment should no bootable drive be found. The second phase is what users see - loading the kernel, kernel modules, network startup, services startup, etc. This happens from a readable drive. We need to interact with both here.
1

 GRUB_CMDLINE_LINUX="rd.driver.pre=vfio-pci rd.driver.blacklist=nouveau modprobe.blacklist=nouveau nvidia-drm.modeset=1 resume=/dev/mapper/arch-swap rd.lvm.lv=arch/root rd.lvm.lv=arch/swap rhgb quiet intel_iommu=on iommu=pt pcie_acs_override=downstream"
Here’s what each command does:
-
rd.driver.pre=vfio-pciloads thevfio-pcistub driver in the ram drive before booting. -
rd.driver.blacklist=nouveaublocks thenouveaudrivers from being loaded in the ram drive before booting. -
modprobe.blacklist=nouveaupreventsmodprobefrom loading thenouveaudrivers after that initial boot. -
nvidia-drm.modeset=1enables Direct Rendering Manager in the Linux kernel, improving user-space program performance by exposing an API in the kernel to use the graphics card directly. -
resume,rd.lvm.lvare specific to each machine.5 They declare logical volumes for suspend/resume functionality, as well as where to load system files from and what partition to use for swap as it transitions from the initfs ramdrive to the actual hard drive. -
rhgbgives you the pretty boot loader interface. It’s short for “Red Hat Graphical Boot” and is similar to thesplashdirective for Debian-based distributions. -
quietsuppresses messages at boot, which can be read in/var/log/boot.logif needed. -
intel_iommu=onflags the IOMMU instruction set on Intel CPUs. If you have an AMD,amd_iommu=onis the equivalent for them. -
iommu=ptspecifies to use “passthrough” mode for IOMMU, allowing the KVM hypervisor to directly use the device instead of relying on DMA for the device we’re giving to the VM. -
pcie_acs_override=downstreamallows this capability to be used by all PCIe devices attached to the PCIe bus.
This will work as is, but it’s not how I have this set up myself. I would strongly suggest you allow this only for the specific device(s) you’re planning on passing through, so it’d look like
pcie_acs_override=id:10de:1c82,id:10de:0fb9instead. -
-
Rebuild GRUB’s configuration so it’ll persist across reboots.
1

 sudo grub2-mkconfig -o /boot/efi/EFI/fedora/grub.cfg
Whenever changes are made to
/etc/default/grub, we need to make the configuration files it uses reflect those changes. This command runs whenever you install a new kernel via RPM, so it will be done for you when you’re installing the new kernels later on, but we’ve got to do it ourselves for the first time. -
Create or edit
/etc/modprobe.d/local.conf, adding the line below:1
install vfio-pci /sbin/vfio-pci-override.sh
This file tells
modprobewe’re going to need to run an install script later on in the boot process. -
Create or edit
/etc/dracut.conf.d/local.conf, adding the line below:1 2
add_drivers+= " vfio vfio_iommu_type1 vfio_pci vfio_virqfd " install_items+=" /sbin/vfio-pci-override.sh /usr/bin/find /usr/bin/dirname "
Dracut is a (mostly Red Hat specific) framework to make that transition between an initial ram drive and finding the real bootable system partition less reliant on specific scripts, arguments, and other shenanigans between kernel versions. Upgrading your kernel used to be really hard and this is one of the abstractions to make it more reliable and easier on us humans.
-
Create a file
/sbin/vfio-pci-override.showned by root and with permissions755. Here’s the contents of the script:1 2 3 4 5 6 7 8 9 10 11 12 13 14 15 16
#!/bin/sh # This script overrides the default driver to be the vfio-pci driver (similar # to the pci-stub driver) for the devices listed. In this case, it only uses # two devices that both belong to one nVidia graphics card (graphics, audio). # Located at /sbin/vfio-pci-override.sh DEVS="0000:02:00.0 0000:02:00.1" if [ ! -z "$(ls -A /sys/class/iommu)" ] ; then for DEV in $DEVS; do echo "vfio-pci" > /sys/bus/pci/devices/$DEV/driver_override done fi modprobe -i vfio-pci
You likely need to modify the line that starts with
DEVSto be the device IDs of the devices you’re going to give to the VM (and therefore use the passthroughvfio-pcidriver for). This script will iterate over them, overriding whatever driver the system thinks it should use with what operates like a placeholder. These devices will be unavailable for use by the host machine, but will allocate themselves to the VM when it starts. -
Rebuild the initial boot disk using
dracut- this will now persist across kernel upgrades as well as reboots.1
sudo dracut -f --kver `uname -r`
-
Reboot again!
Verify the drivers in use
Verify that your target hardware is using vfio-pci as the driver. Omit the -s 00:02:00 on another machine to get the entire output, as this argument narrows the output down to the device specified.
1
2
3
4
5
6
7
8
9
10
11
12
13
14
15
16
17
18
19
20
21
22
23
24

nataliepc /h/n/k/kernel $ lspci -vv -n -s 00:02:00
02:00.0 0300: 10de:1c82 (rev a1) (prog-if 00 [VGA controller])
    Subsystem: 3842:6251
    Control: I/O- Mem- BusMaster- SpecCycle- MemWINV- VGASnoop- ParErr- Stepping- SERR- FastB2B- DisINTx-
    Status: Cap+ 66MHz- UDF- FastB2B- ParErr- DEVSEL=fast >TAbort- <TAbort- <MAbort- >SERR- <PERR- INTx-
    Interrupt: pin A routed to IRQ 10
    Region 0: Memory at dc000000 (32-bit, non-prefetchable) [disabled] [size=16M]
    Region 1: Memory at a0000000 (64-bit, prefetchable) [disabled] [size=256M]
    Region 3: Memory at b0000000 (64-bit, prefetchable) [disabled] [size=32M]
    Region 5: I/O ports at d000 [disabled] [size=128]
    Expansion ROM at dd000000 [disabled] [size=512K]
    Capabilities: <access denied>
    Kernel driver in use: vfio-pci
    Kernel modules: nouveau, nvidia_drm, nvidia

02:00.1 0403: 10de:0fb9 (rev a1)
    Subsystem: 3842:6251
    Control: I/O- Mem- BusMaster- SpecCycle- MemWINV- VGASnoop- ParErr- Stepping- SERR- FastB2B- DisINTx-
    Status: Cap+ 66MHz- UDF- FastB2B- ParErr- DEVSEL=fast >TAbort- <TAbort- <MAbort- >SERR- <PERR- INTx-
    Interrupt: pin B routed to IRQ 11
    Region 0: Memory at dd080000 (32-bit, non-prefetchable) [disabled] [size=16K]
    Capabilities: <access denied>
    Kernel driver in use: vfio-pci
    Kernel modules: snd_hda_intel
Now we’re in business! 🎉
Set up your virtual machine
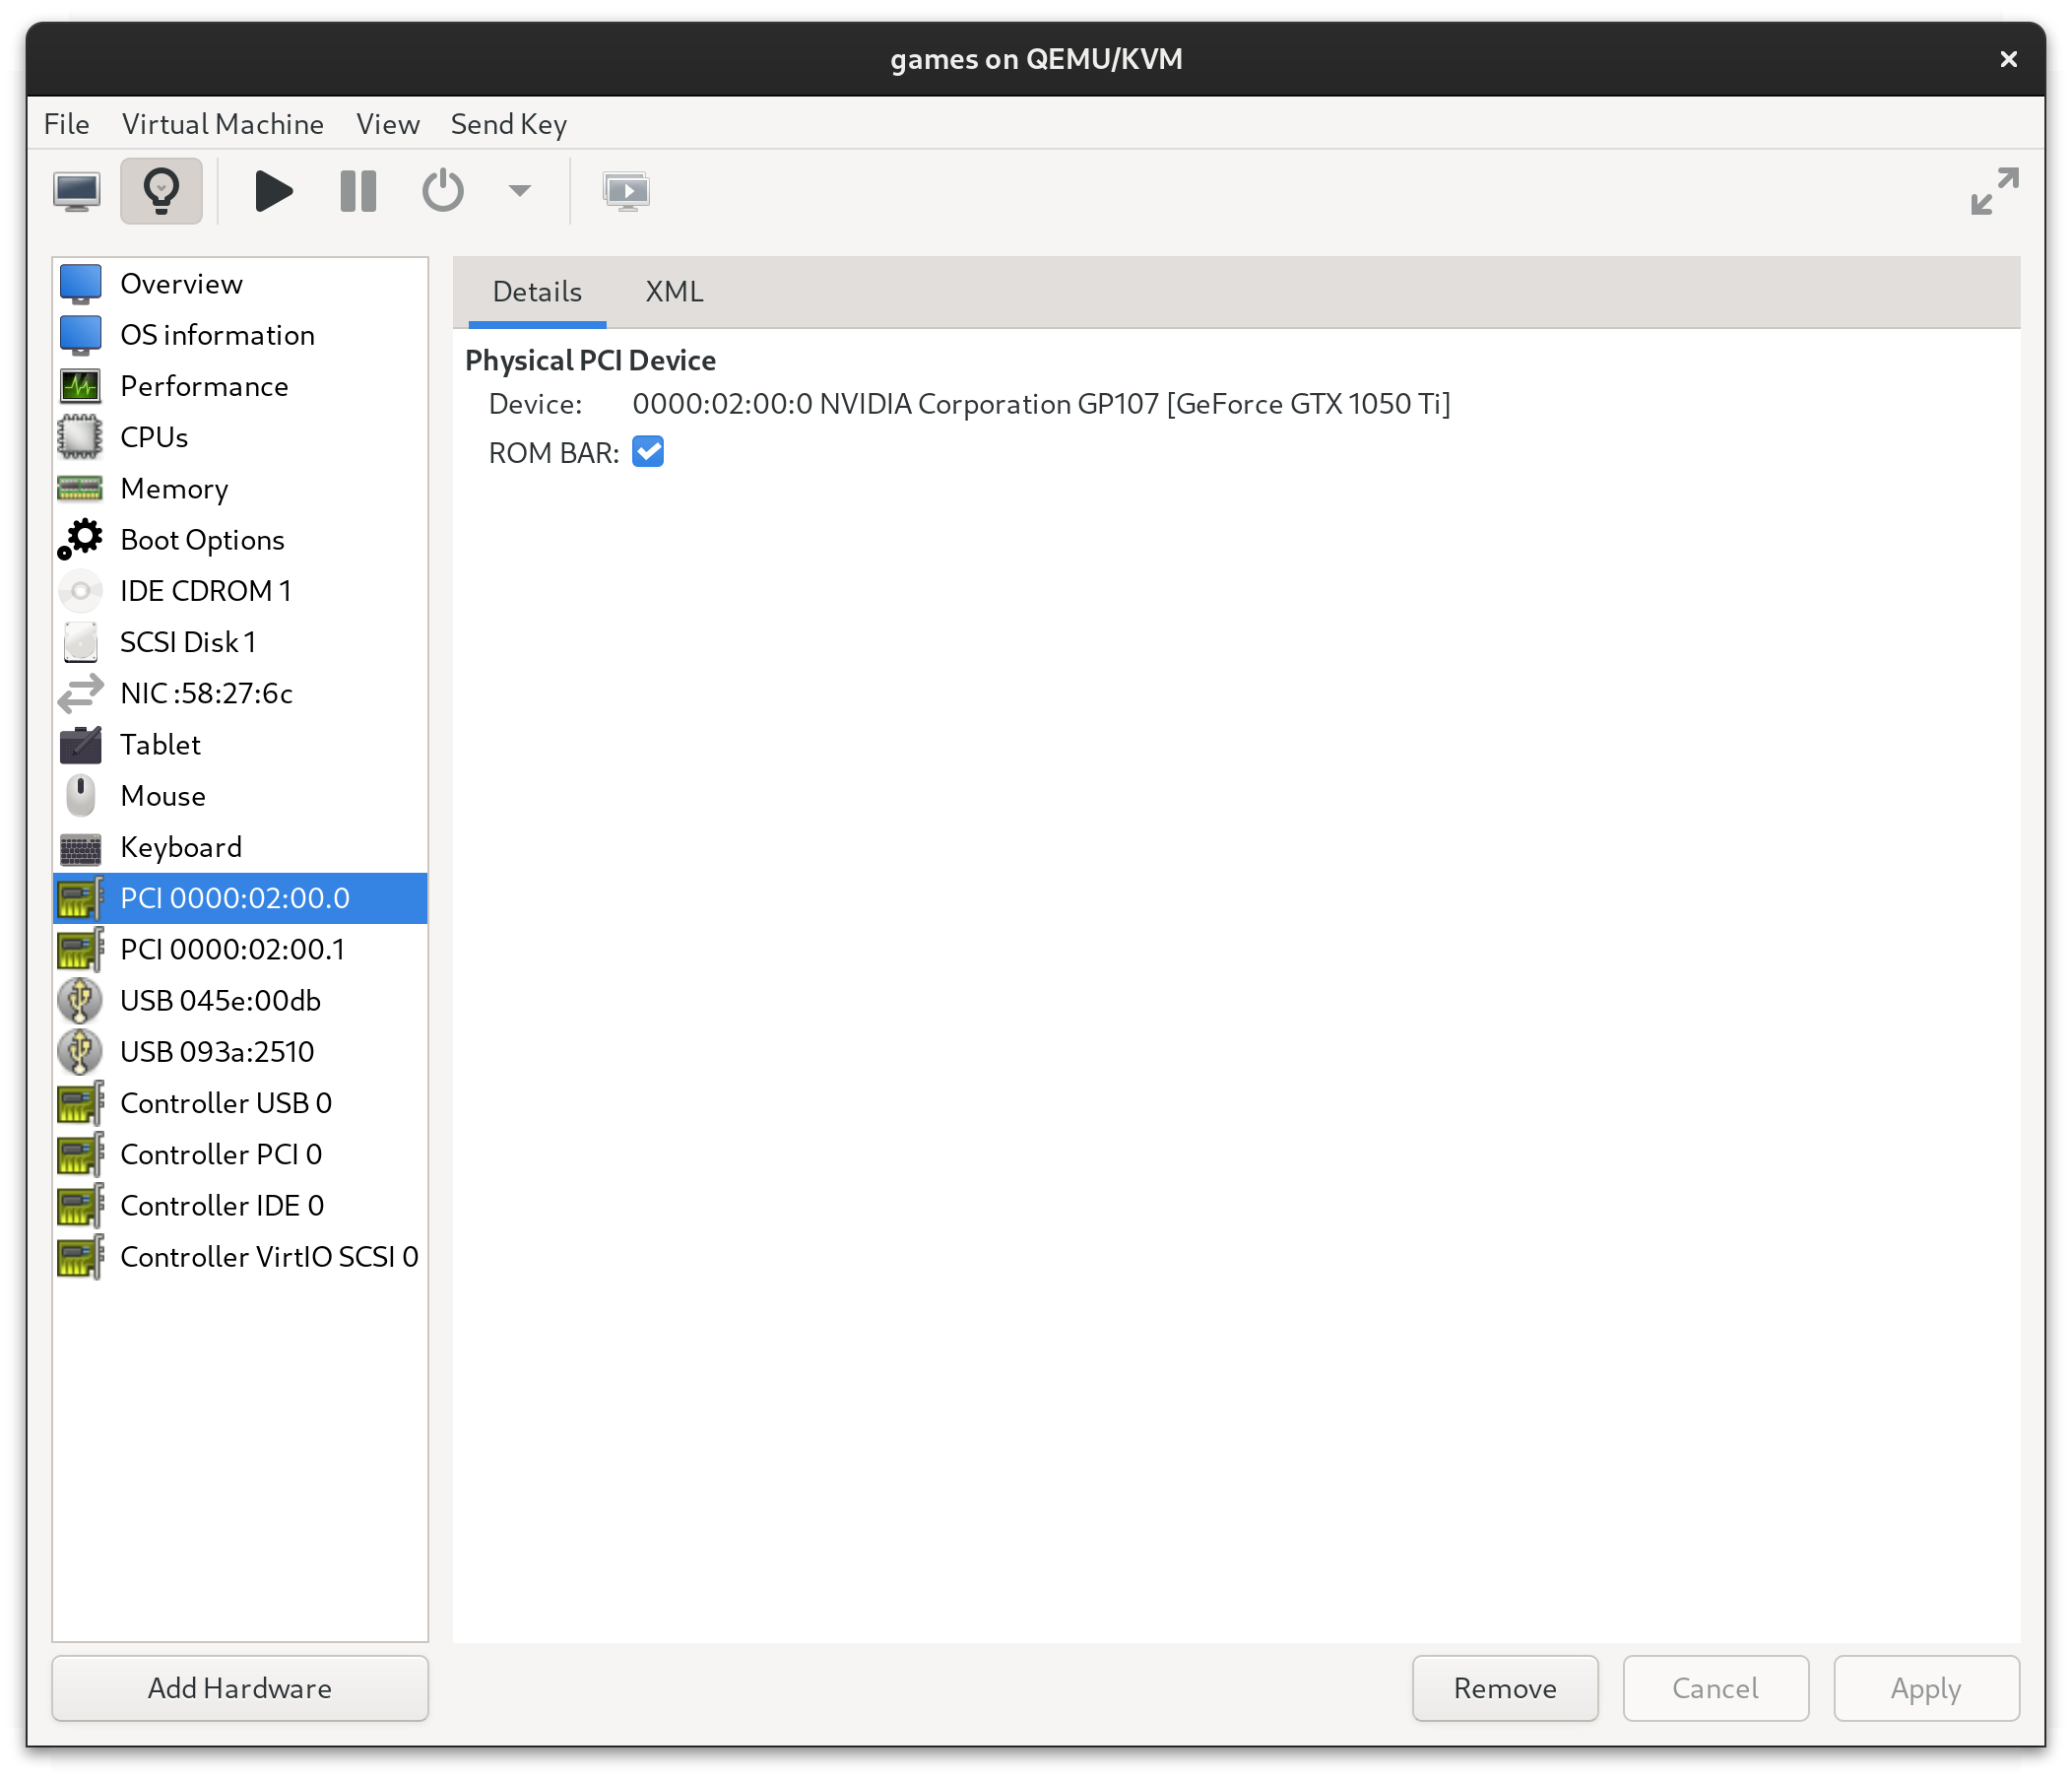
It’s pretty straightforward to add PCI hardware by address in Virtual Machine Manager if you’ve used any other virtualization software before. You can read all about the different settings for performance tuning your VM in the resources section, but here’s a few things I’ve found helpful for a Windows VM for gaming.
- Passing through USB keyboards and mice are way easier than trying to emulate them. You can do this with a little desktop KVM switch or just have another pair plugged in. I took that second option.
- Fast disks can be passed through to a virtual machine entirely, as can partitions. Just don’t use a spinning disk.
-
CPU pinning is very helpful as it provides predictable CPU scheduling to the VM and caps what it can demand from the host too. In the XML snippet defining the VM below, I have given 4 specific cores to the VM as a 1 socket vCPU. This means my desktop can have all 8 for Linux when the VM isn’t running, but it will only have 4 available to it once the VM starts and those resources get assigned to the VM.
1
2
3
4
5
6
7
8
9
10
11
12
13

  <vcpu placement="static">4</vcpu>
  <cputune>
      <vcpupin vcpu="0" cpuset="4"/>
      <vcpupin vcpu="1" cpuset="5"/>
      <vcpupin vcpu="2" cpuset="6"/>
      <vcpupin vcpu="3" cpuset="7"/>
  </cputune>
  <cpu mode="custom" match="exact" check="partial">
      <model fallback="allow">Skylake-Client</model>
      <topology sockets="1" dies="1" cores="4" threads="1"/>
      <feature policy="disable" name="rtm"/>
      <feature policy="disable" name="hle"/>
  </cpu>
- Don’t mess with dynamic memory allocation in Windows - only pain and suffering is down that path in my experience. Give it enough RAM and it’ll only consume that entire block while the VM is running. That memory is available to the host until the VM starts, then goes back to the host once the VM is powered down.
- Allocate the video card and sound card (from the same PCI device) to the VM and remove the integrated video card that’s emulated. Should look something like this:
Next time
Let’s shove the RPM build into a container to make this repeatable and not on our machine! Building RPMs in containers
Resources
- Alex Williamson’s blog on the VFIO tips and tricks, IOMMU groups , and more - link
- Arch Linux wiki post on PCI passthrough - link
- Red Hat’s documentation on IOMMU groups and virtualization - link
- Linux kernel documentation on VFIO - link
Disclaimer
I put this together based on my own machine at home because I knew I’d forget this process if I ever had to do it again. There was a lot of reading of Bugzilla, StackOverflow, and a bunch of blogs/forums/mailing lists all over the internet. Thanks to everyone who did something similar so I could cobble together something from all of them that Works On My Machine. ✅
Footnotes
-
The exact behavior and alternates available is determined by the driver for the hardware. ↩
-
By trustworthy, I mean built as a first-party alternative kernel by a major distribution. I know there’s a small community in Arch Linux that maintains a contributed package. There’s one for Ubuntu as well. I’m not a terribly trusting user. 🤷♀️ ↩
-
The two or more graphics cards can be different models, but if that’s the case, you really don’t need this patch. ↩
-
This is basically the only part of the project that needs maintenance from time to time when the builds start to fail. ↩
-
I’d tried Arch and decided it wasn’t really my thing, but also didn’t care to reformat or rename the partitions. These likely differ on your machine. ↩