Replacing my router with OpenWRT and a Raspberry Pi
I recently replaced my Ubiquiti USG-3 security gateway (info ) with a Raspberry Pi 4 B (info ) and OpenWRT . My USG-3 acted as a firewall, router, and provided some VLANs to isolate some of our “smart” appliances from the rest of the network. While it hasn’t been officially deprecated, it unfortunately isn’t receiving regular software updates from the vendor either. It’s not inspiring confidence in my router to be updated so infrequently - I love my Ubiquiti switch and WAPs, but this bit of my infrastructure has been on my “replace it” list for a few months. The official OpenWRT on Raspberry Pi wiki page looked promising!
There’s also some hardware consolidation and simplification to do. I want to decommission a dedicated VM for the Ubiquiti management application and an original Raspberry Pi B that runs Pi-hole for DNS ad-blocking. Fewer hardware things is less to manage and update.

I have written a couple times about the benefits of “just buy a fix” (here, and for my employer here ). Were this for business, I would have done this too - just purchase the newest model from Ubiquiti (or whoever else) and call it a day. My time is far more valuable than any money saved in hardware and software.
💸 This makes no economic sense, but it was a ton of fun. I needed to scratch the itch to build something, brush up on my networking knowledge, and wanted to both not lose features and also gain functionality. I’m all about an opportunity to learn new things. Please enjoy my drastically over-engineered router build!
Hardware
Hardware you’ll need:
- Raspberry Pi and power supply - I used a model 4 with 4 GB of RAM. Don’t cheap out on the power supply, especially for things you want to run for a long time to prevent hardware damage.
- Case for 👆 - I used this one for the built-in heat sink. The Pi 4 runs quite warm compared to prior models, so the standard case gets hot enough to throttle the CPU over time.
- Two ethernet cables, one for WAN and another for LAN.
- A second ethernet adapter - I used this one , which is USB 3 to gigabit ethernet and is built on the widely-supported ASIX AX8817 chip.
- MicroSD card - something with a couple GBs and reasonably speedy is good.
- A Linux computer with the ability to read/write microSD cards for flashing the card.
Super helpful for initial setup, but not strictly needed:
- USB keyboard
- Micro HDMI to
whateveradapter or cable for a little display to start
Choosing the software image
There are a lot of images built for OpenWRT - tons of images and chips and other choices to make. Here’s a couple ideas to make in picking the software easier.
- Go to the official firmware selector page.
- By default, the version will be the latest release -
22.03.3as of March 2023. This is fine. - Search for your device and go to that page. Pick the right image to download. Here is the download page for a 64-bit Pi 4.
Because this is a brand new router, we need the factory image. We’ll also be expanding the filesystem to use the entire microSD card. This process is much easier with the ext4 image, so choose that one. SquashFS is a fantastically fast compressed read-only filesystem. It’s great for embedded devices operating at the edge, live CDs, or other applications without many write operations. It is not impossible to expand it (directions ), but isn’t anywhere near as easy as expanding a routine disk partition and filesystem. This device will operate more like a general-purpose firewall and server, so I want that extra space for new software, logs, and the like.
Flashing the microSD card
There’s tons of tutorials specific to your OS on how to write an image to a microSD card. I used GNOME disk utility , the built-in disk manager for my desktop, to write the image and expand the root partition in a couple clicks. Expanding the filesystem is equally straightforward because ext4 is designed to be modified. From the Linux desktop, check the filesystem, then resize it with the two commands below (substituting the correct device).
1
2

sudo e2fsck -f /dev/sdc2
sudo resize2fs /dev/sdc2
Initial boot setup
At this point, I’m still uncommitted to using OpenWRT (over another off-the-shelf device) and don’t want to take down my whole home network just yet to replace the router. This means I’m connecting my Raspberry Pi to a keyboard and monitor. Once I’m more confident it won’t cause any problems, it’ll plug into the small network switch on my desk.
OpenWRT includes a DHCP server (and I’m not sure it’s on or off by default) and will assume a default static IPv4 address of 192.168.1.1, both of which will likely cause a problem on an existing home network where there’s already a DHCP server and gateway. For me to play, I want to initially set it up with only one NIC (the built-in one) that’ll accept an address over DHCP instead.
After plugging it in to monitor, keyboard, and power, OpenWRT will power on to a root shell with no password. Tell it to take a DHCP address on the primary LAN interface.
1
2
3

uci set network.lan.proto=dhcp
uci commit
/etc/init.d/network restart
Now plug the built-in ethernet port into the LAN switch and let it get an IP address.
Software
OpenWRT isn’t a regular “rolling release” Linux distribution and updating/upgrading all packages isn’t best practice. The built-in package manager doesn’t have dependency management and other features that make “upgrade everything” safe. Read more about that in the fine documentation . Nonetheless, we’ll need to pull the updated package lists to install the driver for the USB ethernet adapter. Everything else is optional.
1
2
3

opkg update
opkg install kmod-usb-net-asix-ax88179
reboot
Docker
I’d like OpenWRT to provide routing, firewall, and DHCP address management. I’d like for Pi-hole to continue managing DNS because it’s so darn good at it. It can officially run in a Docker container (link ), so that’s allow me to retire my original model B Raspberry Pi. I’d also like to shove the Unifi app in Docker too - helpfully, someone has already done this on GitHub . Routing and firewall tasks don’t take much compute on a home network, so maybe putting containers at the edge would be feasible here?

OpenWRT includes the ability to run Docker containers, orchestrate (a little bit) with Docker Compose, and manage via Luci (the web UI). The latest stable version (22.03) uses nftables as a firewall under the fw4 wrapper (more on fw4 and nftables within OpenWRT). Prior to this version, it used iptables. This distinction is important if you want to run Docker containers on your router, as Docker doesn’t play nicely without iptables. I iterated over this a few times, and didn’t come across an easy solution that didn’t involve downgrading OpenWRT - the containers ended up on another Raspberry Pi 4 within the LAN that also hosts Kodi .
More configurations
There’s a bunch of basic settings to change for security. Go through all the menus and set things up as you need - changing login passwords, SSH key authentication, NTP, etc. These are boring and important.
The second ethernet adapter should be detected after a reboot. Assign it to be the WAN interface in Luci under Network -> Interfaces. If your ISP has any other settings, do those. More than likely (in the US and on residential internet plans) the default DHCP configuration is fine on this side of the router.
Now set the LAN interface to the static IP address you need with the following shell commands:
1
2

uci set network.lan.ipaddr=192.168.1.1
uci commit
On the next power cycle, it’ll be available at 192.168.1.1.
DNS forwarding
Because I love the Pi-hole project and have a set of hosts files, ad lists, and other such things to block, I won’t be using the router for hosting DNS. After messing around in Docker and feeling less than confident in my abilities to manage nftables and iptables rules simultaneously, DNS is on another internal machine. A couple additional things have to be set up for DNS to work as expected across the network.
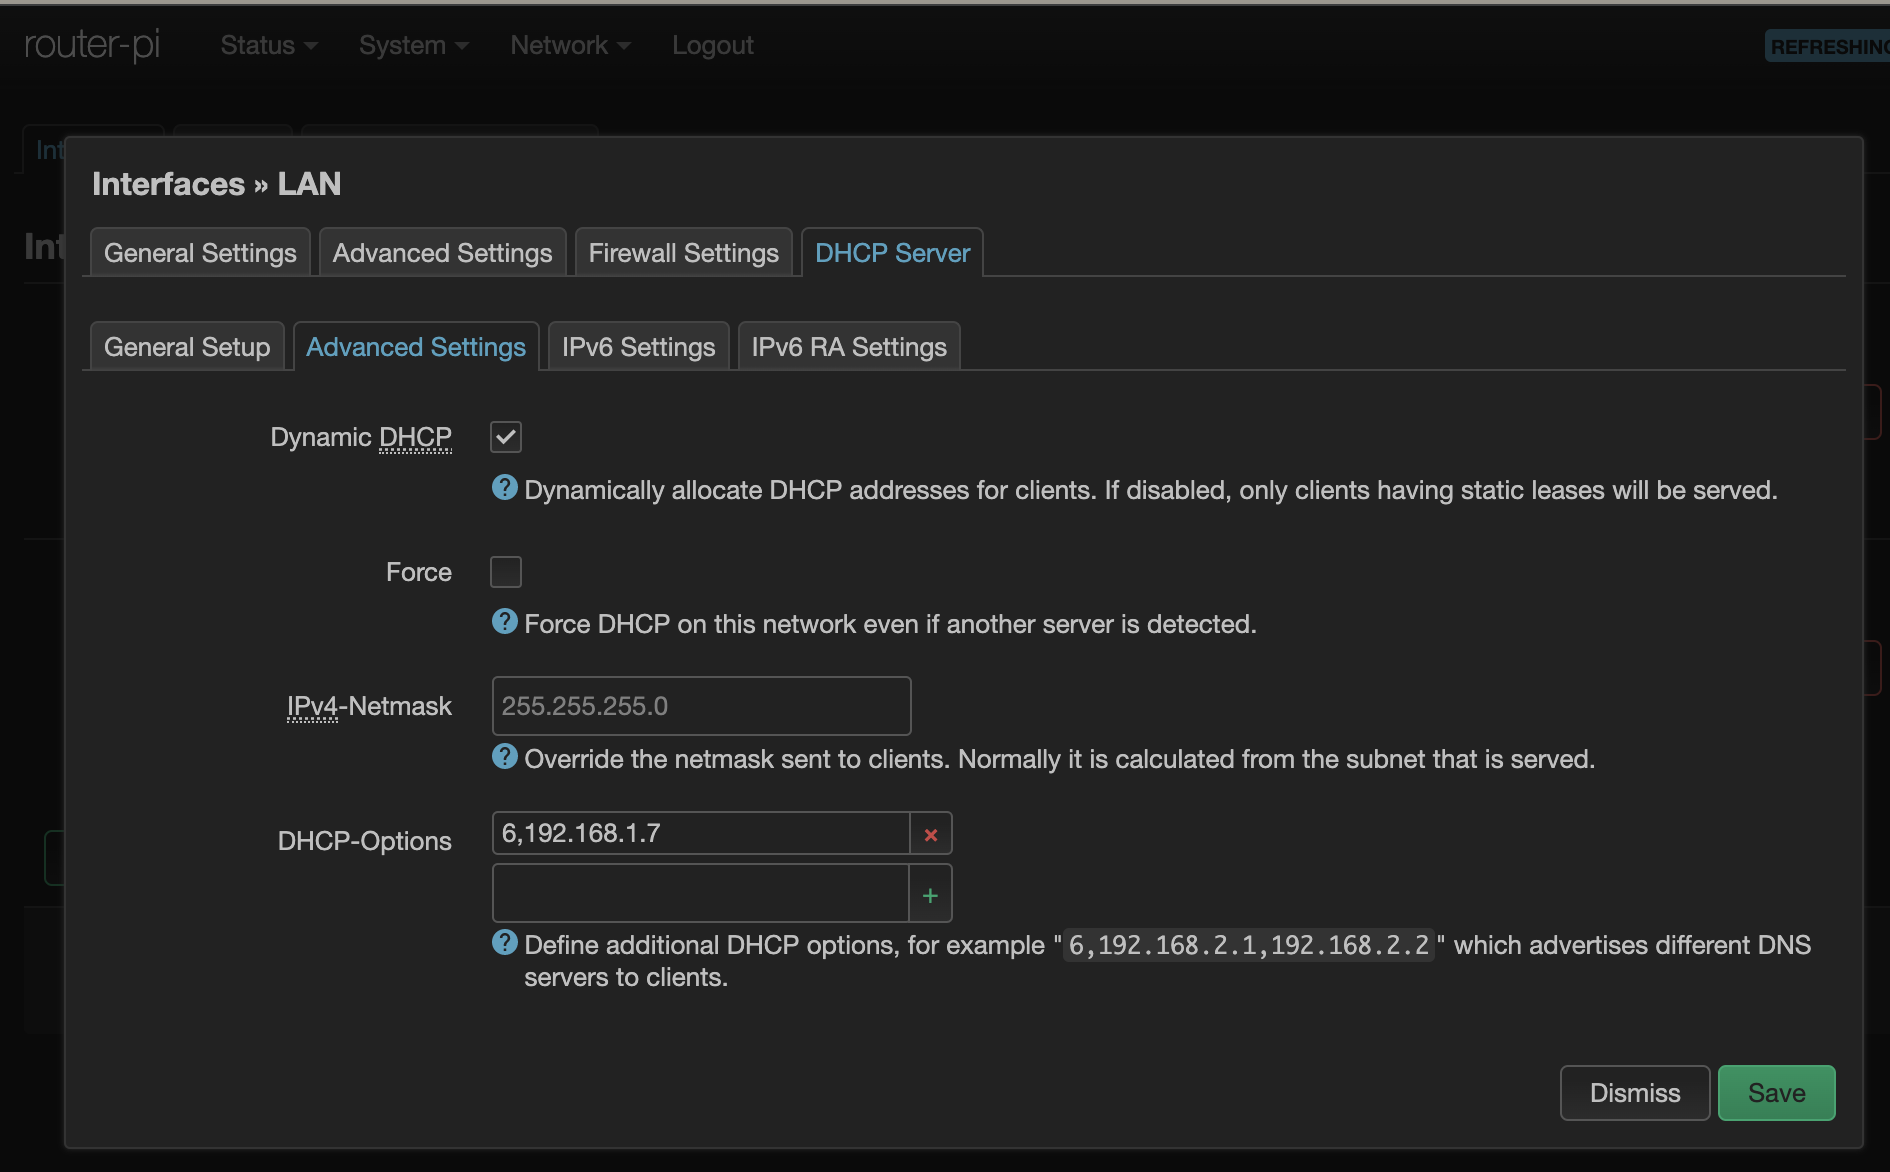
First, DHCP needs to advertise this DNS server. There are about 200 different options defined in the DHCP specification (full list from the IANA ). We just need one in this case. Go to the LAN interface settings and add 6,192.168.1.7 to the options list, where 6 is the option to advertise the DNS server and what’s after the comma is the IP address of your local DNS server.
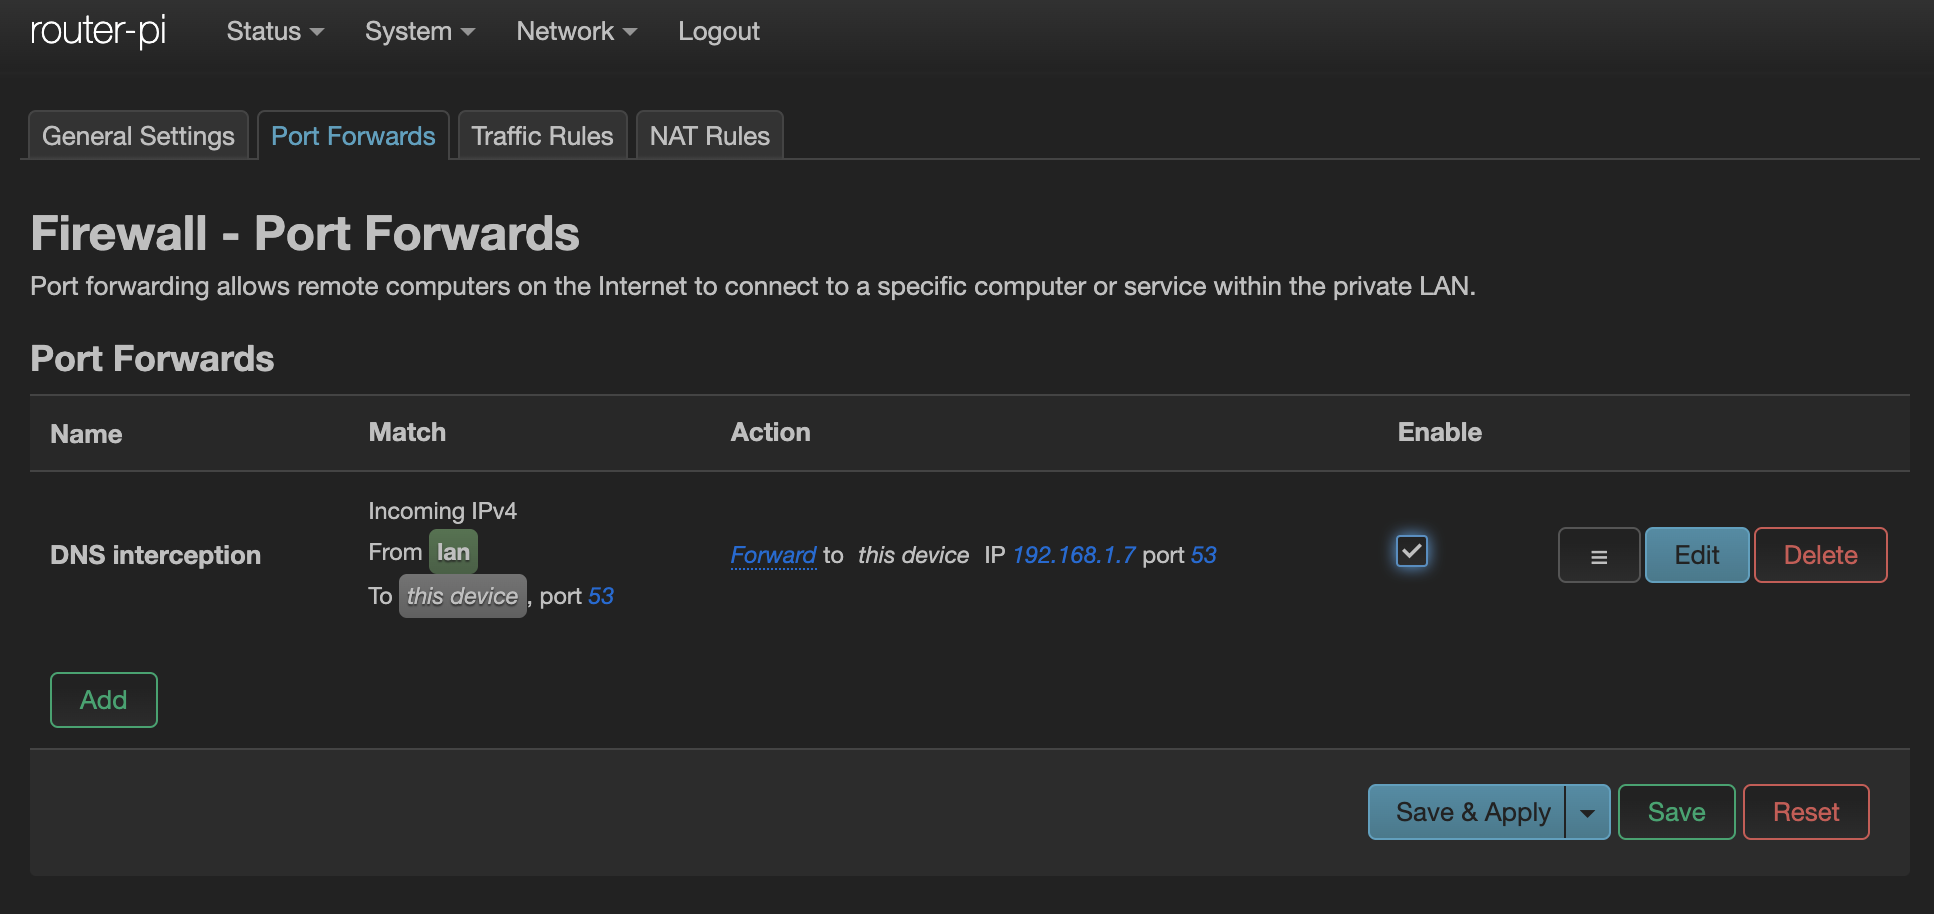
Lastly, all the wayward embedded devices and other “smart” things that have hard-coded DNS servers need to be hijacked for the greater good. This will force everything, including smart TVs and the like, to use the local DNS server instead. Follow the directions here , which work for both the iptables and nftables based firewalls.
Thoughts
It’s surprisingly simple and robust to run OpenWRT on a Pi. I’ve enjoyed scratching the itch to Build A Thing - I am certainly not passionate about routing setup and 👇 is how I feel every time I need to mess with iptablesnftables.

There’s an entire new ecosystem to explore. Luci is a neat web UI and miles easier than the IOS console I learned years ago. There’s so much available in the default opkg ecosystem … maybe I should run a VPN next, or play around with Dynamic DNS to self-host stuff, or any of the other ten thousand software packages. I could set up some real quality-of-service (QoS) services and start messing around with traffic metrics. I’m short on time more than choices here!
Lastly, this is phenomenally over-engineered for a home, even one with multiple people working from home and a fair amount of other connected items. After a week, it’s still averages about 2% of RAM usage (~80 MB) and under 0.02 CPU load in use. It seems that it could easily handle another thousand devices. I won’t be needing that, but it’s nice to know that it’ll be around and updated for years to come because I own it. 💖