Pi-hole configuration for the lazy and slightly paranoid

I’m not sure I know what the “real internet” looks like anymore. 🙈
I’ve haven’t seen much in the way of advertising on the internet in perhaps 10 years or so, as I’ve been running a Pi-hole as a network appliance. It prevents a lot of unsavory content from reaching my home network.1 Here’s how I have mine set up.
There are a ton of fantastic guides on basic setup, but they stop short of some of the very best features to enable - like bypass groups for guests, capturing all traffic to filter, and blocking ads on the go.
Pi-hole 101
What it does
DNS is how applications on your computer know how to reach a service - translating “please go to this cool website” to an IP address that computers understand. Most corporate networks or ISPs have their own servers to do this, but they may sell your browsing history and use it to serve more ads to you. We’ll use a home server to route this data to a trusted upstream provider.
It’s a friendly front-end to a DNS sink hole , a common technique that answers DNS queries with nothingness (hence the “black hole”) based on a policy. This means that your email gets answered correctly, but perhaps a site your admin didn’t want you to go to would no longer work.
That’s what we’re up to here - but at home-network scale!
What it doesn’t do

There’s a lot it won’t do. It’s not magic.
- It’s not a terribly effective tool for preventing phishing or other scams.
- It won’t block network traffic outright. It isn’t a firewall.
- It isn’t going to prevent you from doing silly things, like downloading attachments from unknown emails.
- It probably won’t catch traffic that’s using a VPN for egress, because many VPN clients reconfigure your DNS.
- It likely won’t prevent many “smart” devices from reporting your usage, as they tend to have hard-coded DNS servers.
- It’s probably not going to block all ads.
- It isn’t “parental controls” to prevent all adult-y content from being viewed. It’s not difficult to bypass with access to network settings.
tl;dr - A Pi-hole adds to security posture a bit, may break some websites for a bit while you fiddle with the allow/block lists, but mostly it helps make the internet a quieter, more pleasant place to be.
Consider your reasons
The internet I grew up with was weird. It didn’t demand your attention because existence depended on advertising and had loads of hobbyist content designed to be read. I like the focus on content and lack of distractions that happen when most/all ads are blocked. Blocking social media by default also makes me deliberately choose to engage with it for a limited amount of time, rather than doomscrolling. Preventing some malware, typo-squatting, and “hot singles in your area” pictures is also nice when you have little kids at home.2
A Pi-hole will help with all of these.
Setup
There’s a million guides on how to set one up. The official one is fabulous. Use that.
For hardware, I’m currently using a Raspberry Pi 2 B that I had in a drawer. A plastic case with passive cooling is all that’s needed. Use a reasonable power supply and a microSD card, though, as these tend to be the biggest factors on longevity.3
For software, I’m using the default Raspberry Pi OS Lite . There’s no need for a desktop GUI. The OS and the Pi-hole app automatically update themselves once a week with GitHub Actions - more on that setup here and the workflow file in use.
Network settings
Turn off DHCP on your router and let the Pi-hole handle it instead. The general directions are decent, but you may need to look up the specifics for your router.
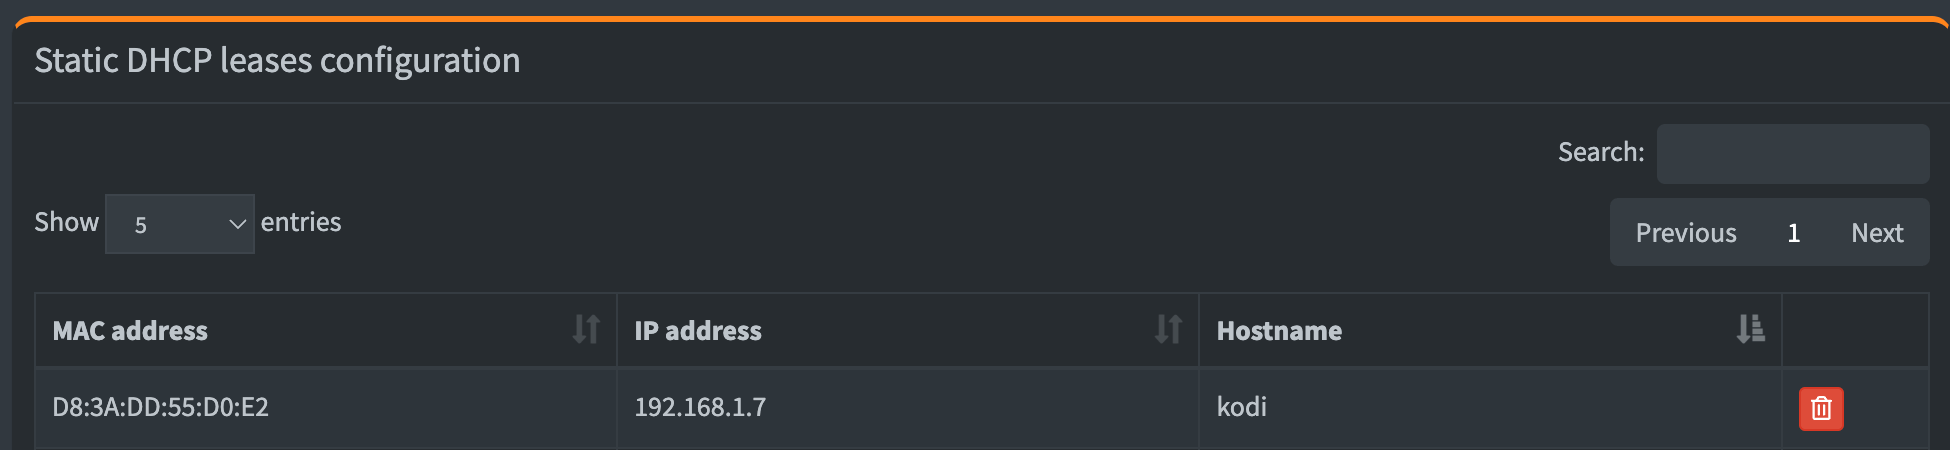
Resist the temptation to use static IP addresses for your home lab. DHCP static leases are better than static IP addresses here. Go to http://PIHOLE-IP-HERE/admin/settings.php?tab=piholedhcp, then see the MAC address of each device on your network in the Pi-hole user interface. Scroll down a little to set them as shown below. By using static leases, you can change/wipe/rebuild devices without having to worry about setting IP addresses again - the DHCP server remembers the hardware address and will give it the same IP address. It’s a small setting that make running a home lab a little easier.
Set up NTP for system time. The Raspberry Pi doesn’t have a real-time clock . Any power or network interruption means the system time won’t be accurate. It relies on the network to know what time it is for logging, and more importantly, for DNSSEC to know which responses are authentic. Directions vary by operating system.
This also means that the system time on this little computer is my first place to check on any “network weirdnesses” anyone notices. 🕵🏻♀️
Domain block and allow lists
There are a ton of opinions on which ones to use and more. More lists/entries aren’t better - for security or privacy or anything else.
However, don’t discount the cost of your time to run this either. I do not care that there’s millions of entries in my block list or that most entries are probably garbage or dead now. It’s been operational for nearly 10 years. I add things and never spend the time to remove them. People time is valuable, these can always be revised if needed, I’m not likely to prune these lists later, the compute time to parse them is trivial, and adding something to the allowlist is simple so … don’t sweat it? 🤷🏻♀️
Here are a few additional sources for blocklists to consider.
- https://github.com/blocklistproject/Lists
- https://github.com/lightswitch05/hosts
- https://firebog.net/
More important are what you’re explicitly allowing. Here’s a few lists that are useful of common things to allow.
- https://discourse.pi-hole.net/t/commonly-whitelisted-domains/212
- https://github.com/anudeepND/whitelist
If you notice anything weirdly not working as expected, check the recently blocked queries at http://PIHOLE-IP-HERE/admin/queries.php?forwarddest=blocked and you’ll likely find the culprit.
Device management groups
This is the best feature! The documentation has some great examples, but specifically the blocklist management example is the best walkthrough. I have three groups set up with a few devices in each group.
- Default - blocks what’s on the block list, everything is here unless it’s somewhere else.
- Bypass - blocks nothing at all, useful for guests to bypass the block list.
- No internet - for “smart devices” to access each other on the local network4, uses the no-dns-at-all list , helpfully shown below in full.
1

(\.|^)*$
Hijack for the greater good
Since many consumer devices have hard-coded DNS servers, you will need to hijack all DNS traffic to go through the Pi-hole in order to filter it as well. Many routers do not expose this feature to you. My home router is running OpenWRT . It’s astonishing how chatty some of these devices can be and you’ll have never seen that traffic in the DNS query logs.
Using the LuCI web UI, here’s how to intercept all traffic over the DNS ports.
- Navigate to Network → Firewall → Port Forwards.
- Click Add and use the following values:
- Name = Hijack-DNS
- Restrict to address family = IPv4 (and IPv6, if you’re using it internally)
- Protocol = TCP, UDP
- Source zone =
lan - External port =
53 - Destination zone = unspecified
- Internal IP address = IP address of Pi-hole (eg,
192.168.0.2) - Internal port =
53
- Click
Save, thenSave & Apply.
This has the highest chance of breaking things in my experience. Do this only when you’re around for a while to troubleshoot and mess with the allow list as much as you’re comfortable.
On the go
Lastly, I make my Pi-hole available on my personal Tailscale network , that way I can have a peaceful internet experience while I’m on the road. It’ll encrypt and route all my traffic back home, including my DNS queries. Their setup guide is all I needed, but do make note of the troubleshooting step at the end to configure it to respond on all interfaces (for use by anything on your Tailnet via the tailscale0 interface).
Conclusion
I love this thing and after nearly a decade, can’t ever live without it removing so much noise from the internet. Taking another couple steps after the initial setup is complete brings so much more functionality beyond the built-in defaults. Once it updates itself automatically, it really is a set-and-forget appliance. Apart from the now-infrequent tweak to the block/allow lists, it doesn’t require effort anymore. It may increase the security posture of my home network some, but more impactful is the deep peace of mind and ability to focus that it brings to my internet life. 🧘🏻♀️
 AI prompt: a computer datacenter, full of racks with ripe red raspberries
Footnotes
-
I agree with this lovely comic from Zen Pencils illustrating a Banksy quote on advertisements. I don’t want that content in my life, so I block it. ↩
-
I know this won’t last forever, but I’m okay not having these conversations today. ↩
-
A fantastic read on considerations for a long-running Raspberry Pi is well worth the time if you want to learn more. ↩
-
Purchased a new TV, connected it to our wifi, and it immediately starts playing Kitchen Nightmares at half volume (loud!) in front of the kids. There’s nothing quite like a small child crying because they’re upset that a “neighbor is yelling and being mean on the TV” for an hour. Thanks, Samsung. 🖕🏻🖕🏻🖕🏻 ↩