Shrinking container images (part 2) - tidying up your builds
Some containers are big and with a good enough reason to be big. Reliably reducing their size isn’t difficult or complicated. Big images can be secure, too. Let’s unpack the relationship between size, security, and the practices that can help - starting with the simplest task of tidying your container build.
What exactly are we tidying, anyways?
The user-visible size of a container image is how big a compressed archive is. This archive has every layer in the image. It’s what gets pulled when you run docker pull or is controlled by the Kubernetes ImagePullPolicy.
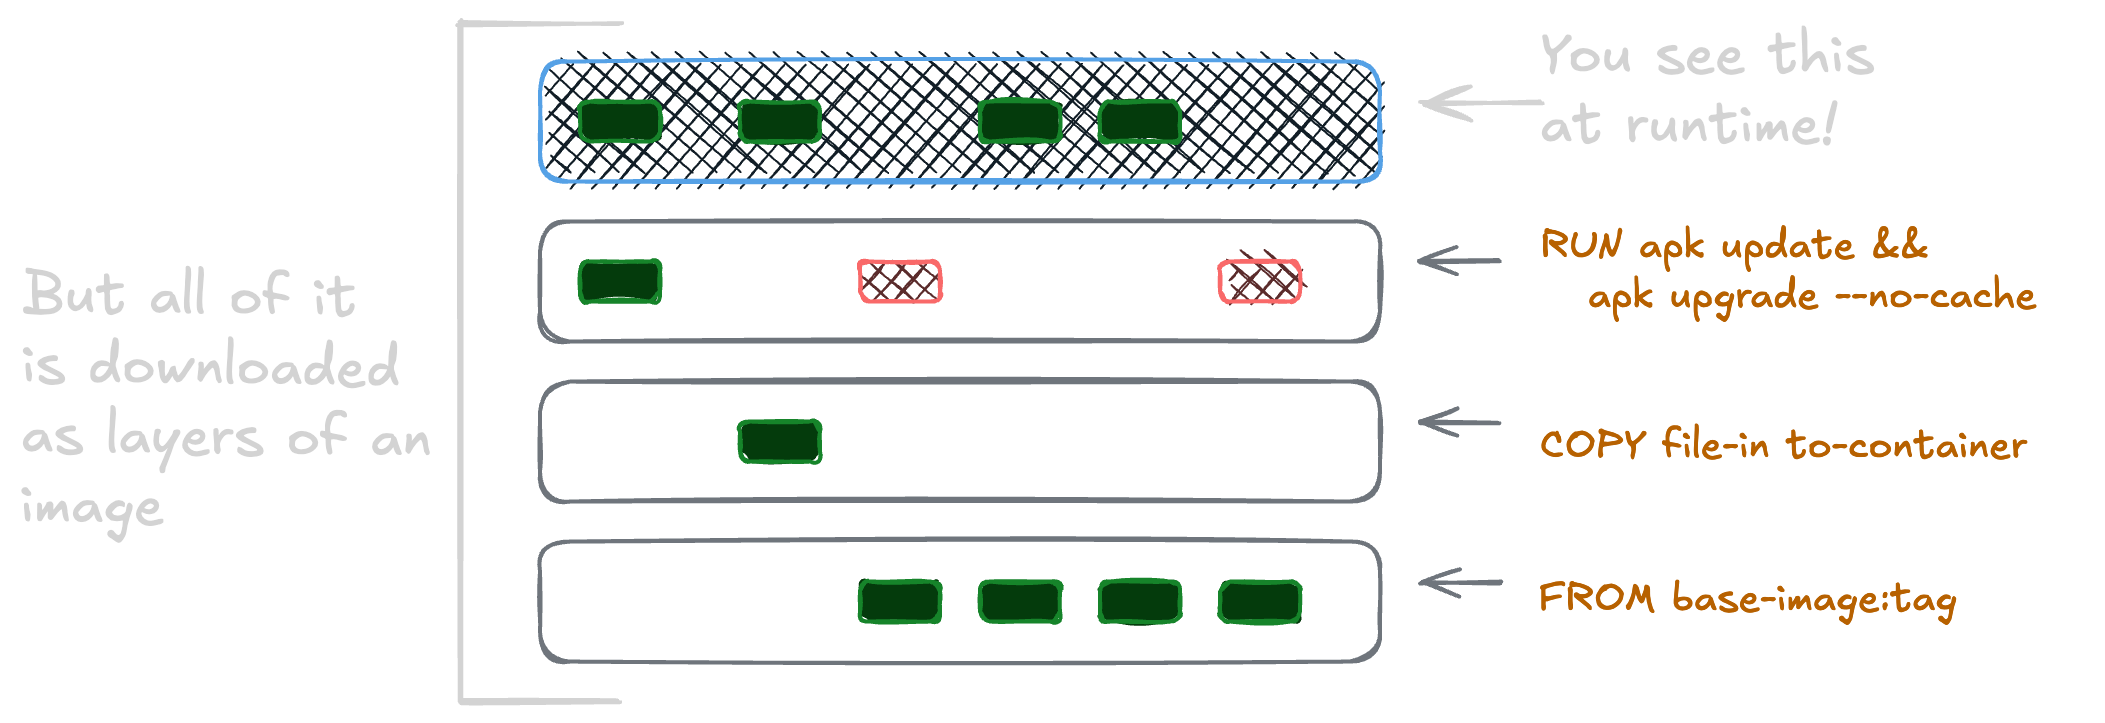
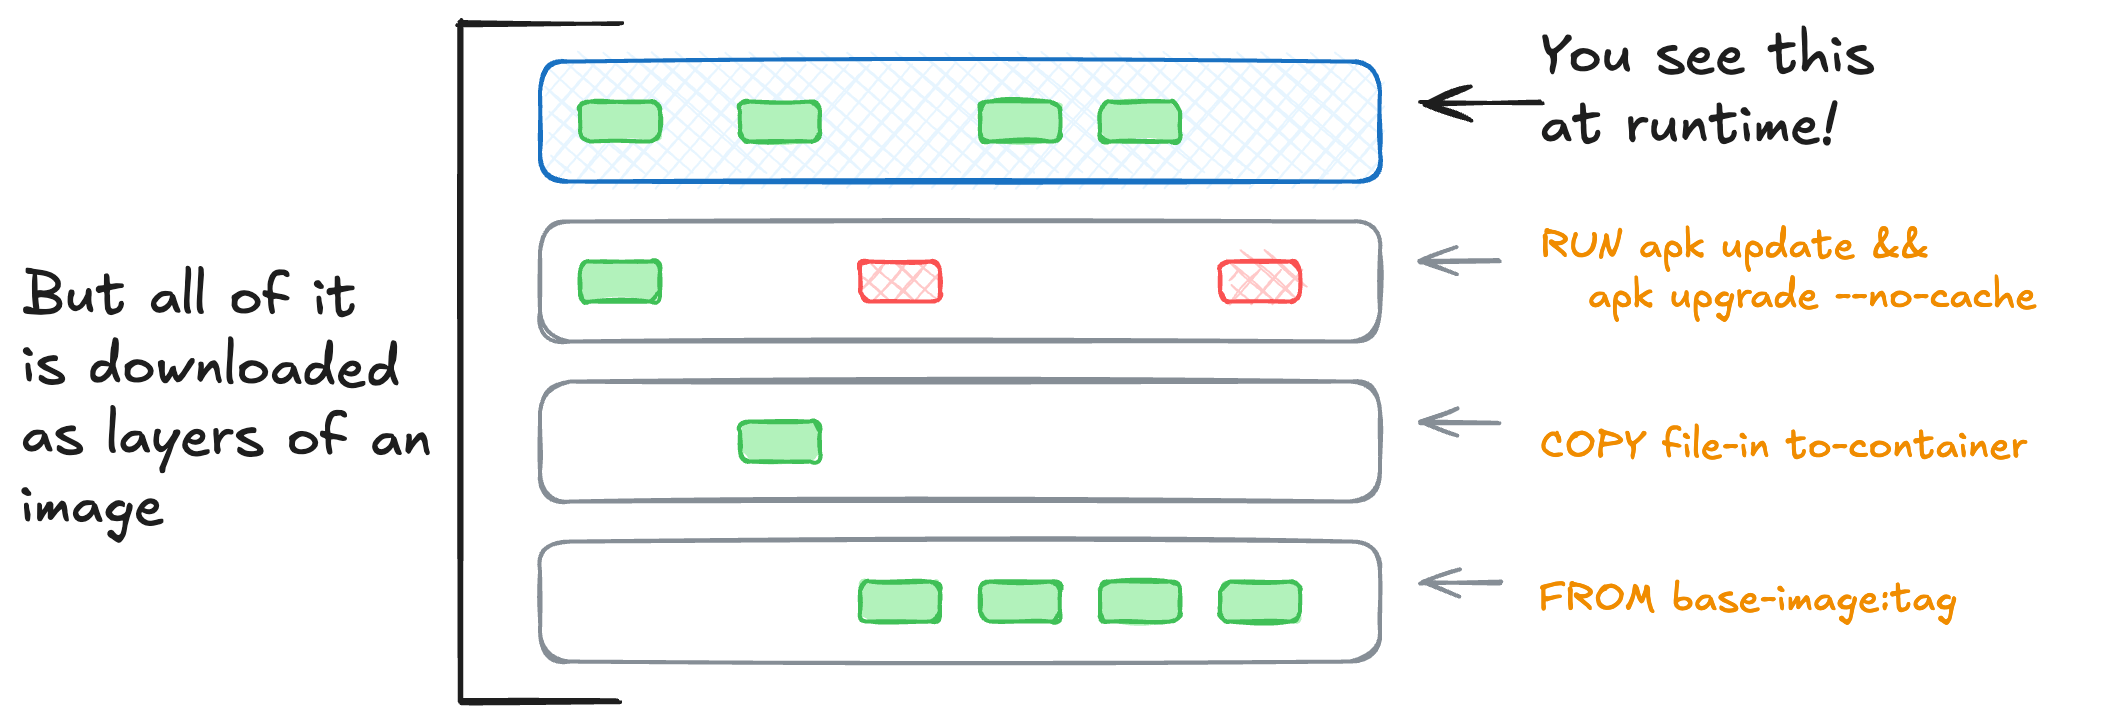
A container isn’t always the “end” layer, but a composite of multiple layers together overlayed on top of each other. This primitive is critical to how a container is a process that can carry along all of its’ dependencies … and that’s why it’s called overlayfs.1
By minimizing the changes that happen across each of these layers, we minimize the delta between each one. This reduces the finished image size. It’s also why many Dockerfiles have long shell one-liners. Trying to fit more instructions into a single RUN statement can optimize the finished size dramatically.
Now that we understand how container images store information, let’s walk through a few patterns to look for and how to fix them.
Copying in files
Layers are additive, but cost nothing themselves. An empty layer doesn’t add to the size of the image, but the changes that happen in each layer do. Each COPY statement creates a new layer, and each layer adds to the finished image size. Let’s see this in action.
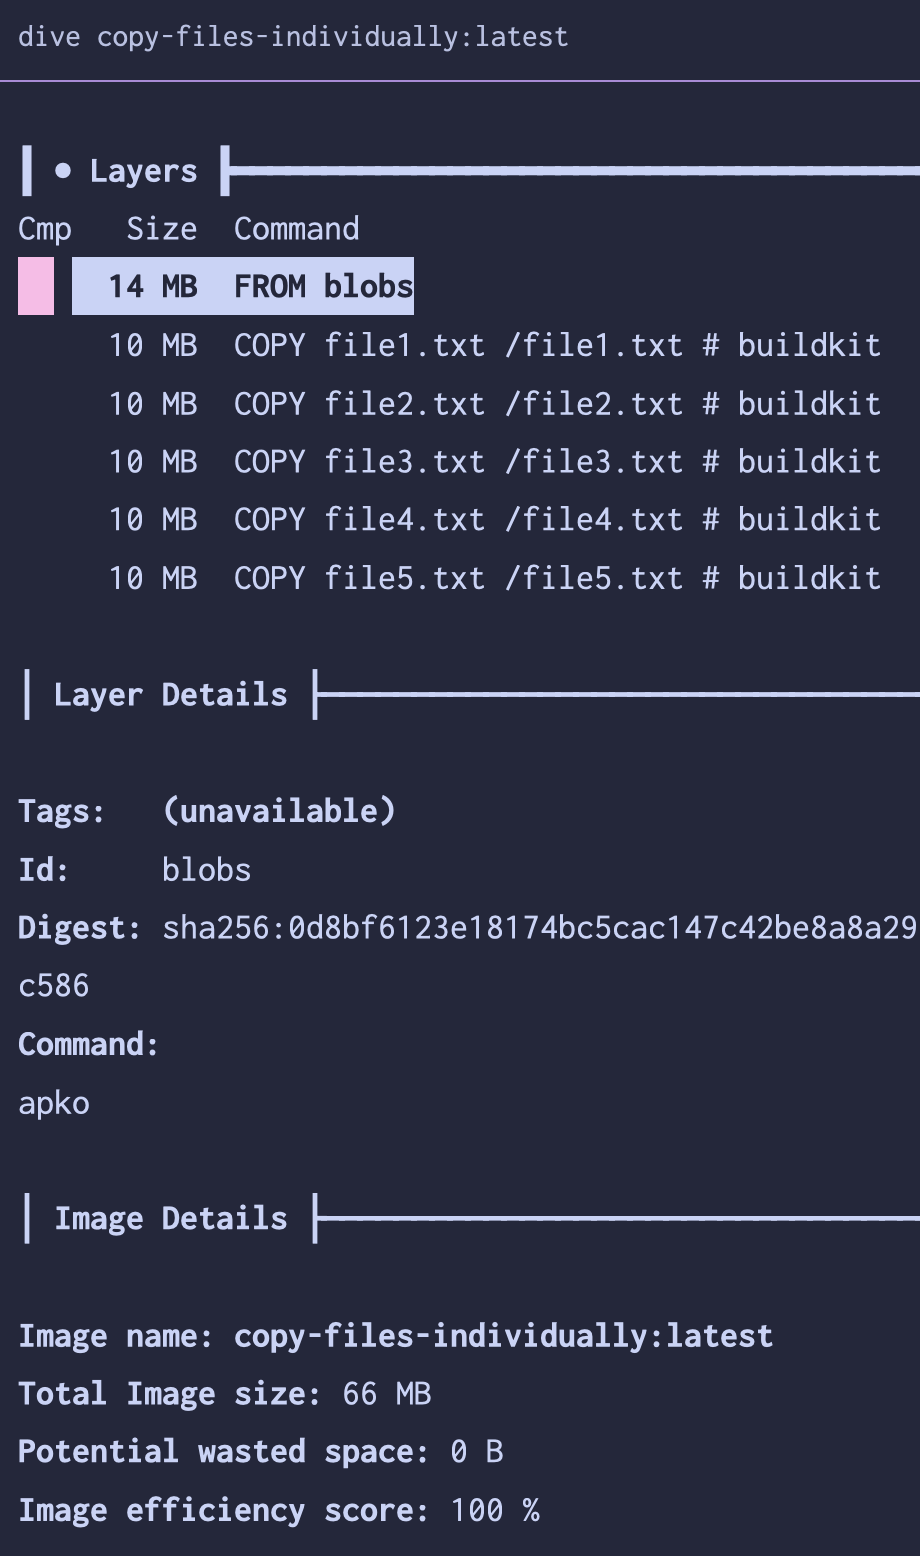
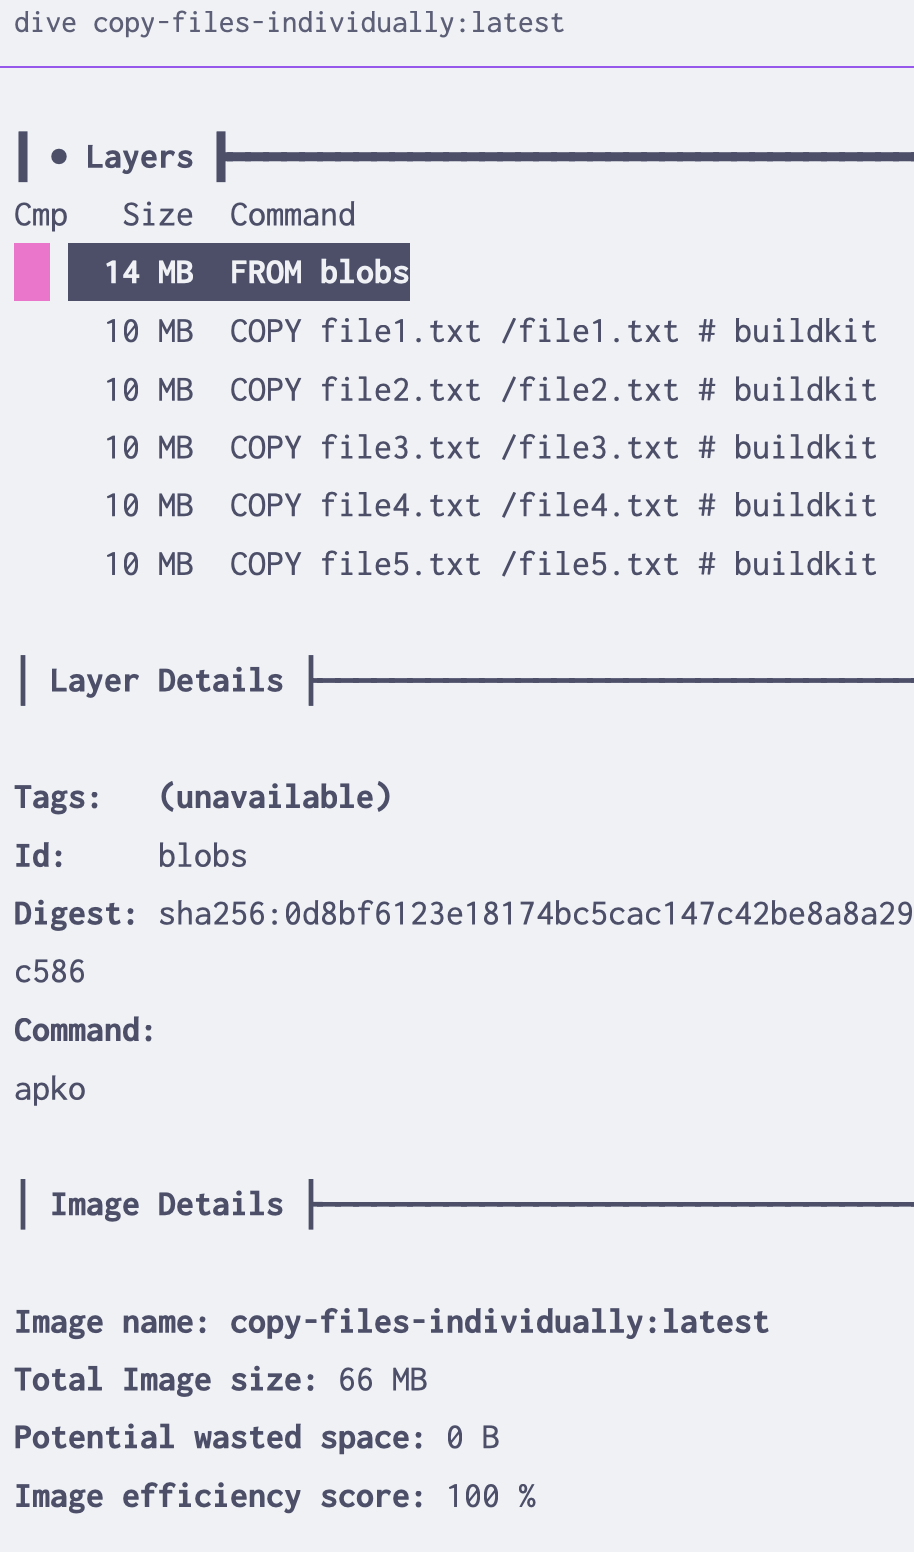
Create 5 files of random data (10 MB each) and copy them into a base container image.
1
2
3
4

#!/bin/bash
for i in {1..5}; do
  dd if=/dev/urandom of=file$i.txt bs=1M count=10
done
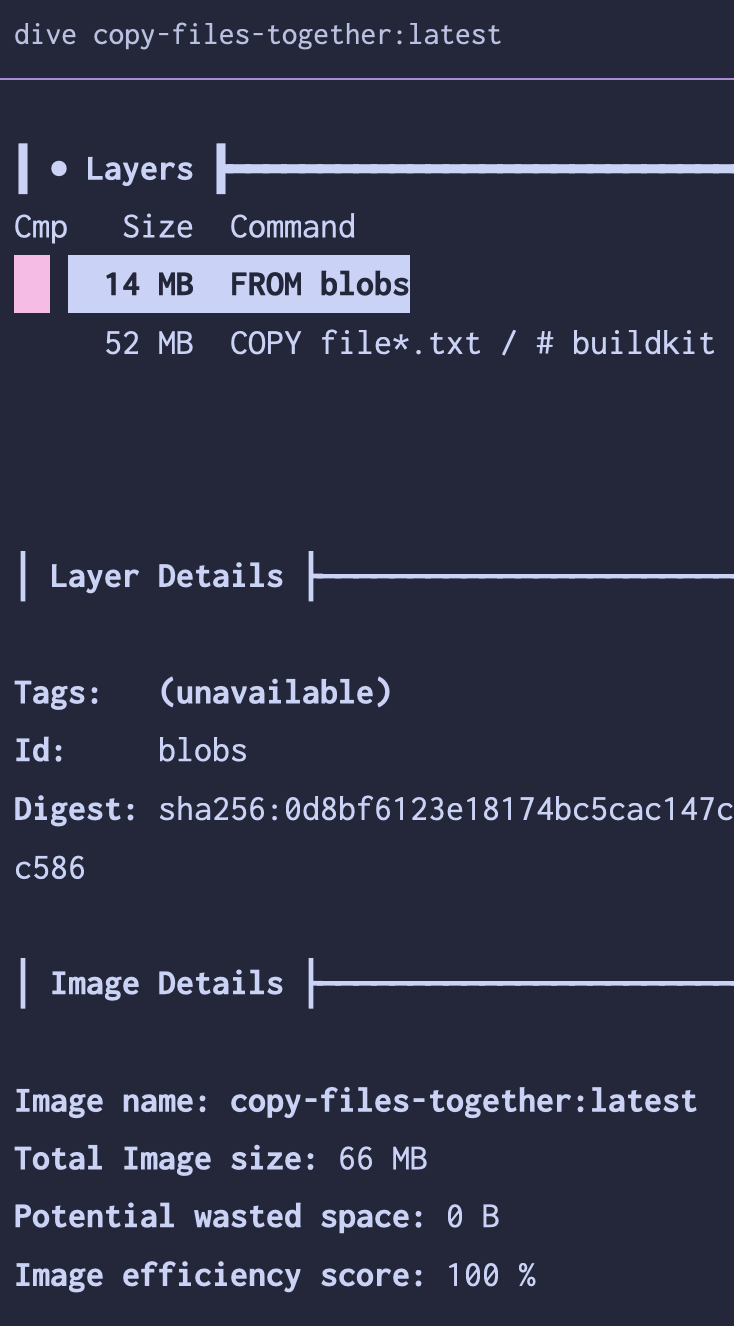
Next, we’ll create two Dockerfiles to copy these files into a base image. The first will copy them in one at a time, the second will copy them all in at once.2 Using a tool called dive to explore the finished images, we can see what little difference this makes.
Becauses layers cost (almost) nothing, adding 10 MB over 5 layers is the same as adding 50 MB in one layer. If what needs to happen is copying in “finished” files, such as precompiled binaries or static assets, it doesn’t matter how many
COPYstatements you use.
Running software updates
Let’s take a common offender for extra container baggage - base package updates. This is frequently found when “golden image” virtual machine programs decide to build containers too. It’s more space-efficient to update the base image using a newer copy versus messing with package managers to update everything. To test this, we’ll use an older build of a base image and update it in two different ways. The first will update each package in a separate RUN statement, the second will update them all in one.
1
2
3
4
5
6
7
8
9
10
11
12
13
14
15
16
17
18
19
20
21
22
23

# Example - Ubuntu 22.04 (jammy) as a base image, built in the summer of 2023
# Initial size = 69 MB
FROM ubuntu:jammy-20230605

# Bad - this adds 5 new layers of file changes, don't do it!
# Final size = 177 MB  (or +155% over the base image)
RUN apt-get update
RUN apt-get dist-upgrade -y
RUN apt-get autoremove
RUN apt-get clean
RUN rm -rf /var/lib/apt/lists/*

# Better - updates all in one line = all in one layer
# Final size = 123 MB  (or +78% over the base image)
RUN apt-get update \
  && apt-get dist-upgrade -y \
  && apt-get autoremove \
  && apt-get clean \
  && rm -rf /var/lib/apt/lists/*

# Best - bump this tag and rebuild them more often
# Initial size = 69 MB (or +0% over where we started)
FROM ubuntu:jammy-20240911.1
In this case, minimizing the changes that happen at each layer means trying to smash our multi-line shell script into a single line. Shell scripts become one-liners delimited by many && statements and using \ for line breaks to make it readable. This simple change resulted in 54 MB of image size reduction in this example.2
| image | size | total CVEs |
|---|---|---|
| ubuntu:jammy-20230605 | 69 MB | 127 |
| updates-bad | 177 MB | 57 |
| updates-better | 123 MB | 57 |
| ubuntu:jammy-20240911.1 | 69 MB | 57 |
As expected, there isn’t any difference in the security posture of the updated container, only the finished size. It’s best to update the base image directly rather than run package updates within the build. If you must update packages in the build, do it all in one layer.
Installing first-party software
Let’s say you need to add another package into your base image - one of the most common tasks I see with teams building containers.
A package manager maintains a database of installed packages, caches of downloaded packages and metadata about what’s available, and (usually) a history of what’s been installed. Some include rollback capabilities, too. All of this extra data makes great sense for a persistent state in a virtual machine. However, it adds up to a lot of files that can be removed to save space in a container.
To compensate, most “base container images” that come from regular Linux distributions don’t include the cached data. This means you need both to update that cache and then remove it at the end. Here’s how that looks in practice.
1
2
3
4
5
6
7
8
9
10
11
12

# apk (Alpine, Chainguard's Wolfi)
RUN apk add --no-cache some-package

# apt-get (Debian, Ubuntu, and other Debian derivatives)
RUN apt-get update \
  && apt-get install -y --no-install-recommends some-package \
  && apt-get clean
# `apt` is still not considered stable w/o a user, but I use it myself ¯\_(ツ)_/¯

# dnf (Fedora, Red Hat and UBI)
RUN dnf install -y some-package \
  && dnf clean all
For apk (the Alpine package manager), it includes a handy --no-cache flag which both updates the cache and removes it at the end. It’s equal to apk update && apk add some-package && rm -rf /var/cache/apk/*, just a bit easier to read thanks to being purpose-built for containers. In any of these, it’s important to clear the cache at the end to save space for the same reason as updating the base image above.
Resist the temptation to delete the package manager’s database. As examples, /var/lib/rpm/rpmdb.sqlite or /var/lib/dpkg/status are the databases for dnf and apt respectively. They’re not needed for the software to run, but they are needed for the software to be understood by other tools. Delete the caches all day long, but the database is used by many upstream tools to understand the security posture of the container and the software inside of it.
For finding and fixing these in container builds, I recommend two practices:
- 🤖 A linter, such as Hadolint , can catch a lot of this automatically. Run it locally or as part of a pull request check … or both!
- 👩🏻💻 Code review - another knowledgeable human can catch this a lot of times.
These will both help keep your builds a bit smaller without breaking anything. These sorts of “need to know the package manager flags” type of trivia are impactful, easy to forget, and even easier to automate.
Installing third-party software
Alright, now let’s install some software outside of our container distribution’s package repo. Using the same principles as above, we’ll need to understand this new software’s needs before knowing how to optimize it. Remember:
- Copying in files doesn’t add beyond the size of the files themselves.
- Installation scripts should be minimized to one layer and need to clean up after themselves.
- Obfuscating the above two points with a
RUN curl install-script.sh | bashmay help reuse across container builds3 … but don’t forget that the script execution is a single layer, so all cleanup from the installation needs to happen inside the script too.
Here’s a few examples to install common tools for CI runners that aren’t always up-to-date in a distro’s package repository.
1
2
3
4
5
6
7
8
9
10
11
12
13
14
15
16
17
18
19
20
21
22
23

# Example - installing Helm
# it's `curl | bash`
RUN curl -fsSL -o get_helm.sh https://raw.githubusercontent.com/helm/helm/main/scripts/get-helm-3 \
  && chmod 700 get_helm.sh \
  && ./get_helm.sh \
  && rm get_helm.sh

# Example - installing kubectl
# simple static binary that changes by target platform (amd64, arm64, etc.)
ARG TARGETPLATFORM
RUN export ARCH=$(echo ${TARGETPLATFORM} | cut -d / -f2) \
  && curl -LO "https://dl.k8s.io/release/$(curl -L -s https://dl.k8s.io/release/stable.txt)/bin/linux/${ARCH}/kubectl" \
  && curl -LO "https://dl.k8s.io/$(curl -L -s https://dl.k8s.io/release/stable.txt)/bin/linux/${ARCH}/kubectl.sha256" \
  && echo "$(<kubectl.sha256) kubectl" | sha256sum --check | grep -q "kubectl: OK" \
  && install -o root -g root -m 0755 kubectl /usr/local/bin/kubectl

# Example - installing Docker CLI, which doesn't follow the same architecture names
# curl, untar it, remove the tarball (but assuming you're in the correct directory to start)
RUN export DOCKER_ARCH=x86_64 \
  && if [ "$RUNNER_ARCH" = "arm64" ]; then export DOCKER_ARCH=aarch64 ; fi \
  && curl -fLo docker.tgz https://download.docker.com/linux/static/stable/${DOCKER_ARCH}/docker-${DOCKER_VERSION}.tgz \
  && tar zxvf docker.tgz \
  && rm -rf docker.tgz
There are a ton of different ways to install software within a container, just remember the same principles as above apply here too.
Tidy builds
Once we understand how containers are built, a couple key concepts help us control the size of the finished image.
Empty layers don’t add to the finished size. Most package managers (and many other processes) are somewhat messy on the disk though, caching or leaving files for reuse all over the place. This means that those layers, and the differences between each one, can grow quickly. Compile outside of a container wherever you can, then copy the artifacts in. This keeps the same “messy disk” caches out of the finished container.
No practice here changes the security posture of the container or your build, only the finished size. While some of the examples are curl | bash, it’s no less unsafe in a container than it is out of it.
A few MB isn’t important compared to human focus. It’s tempting to optimize for the sake of it, but there’s a point where it isn’t worth spending too much time optimizing this beyond the basics. Let the bots help you keep things clean automatically as much as you can. A linter like hadolint should catch much of this for you. Code review is a good thing for catching the trickier implementation parts that a linter can’t catch.
There is no substitute for knowing the software you’re installing, how all of these tools work, and what they need to run. This is the most important part of keeping your container images efficiently sized.
📦 Next up - How and why to ship only the finished image as a single layer in Part 3: Squashing big builds
Footnotes
-
Some great resources on OverlayFS from Wikipedia , the Arch Linux Wiki on OverlayFS , and the Docker documentation . ↩
-
Image size and builds were done in Jan 2025, as were scans with whatever the latest Grype version was. All files, security data, and such were done at that point in time and this won’t be kept up to date as time progresses. Files for building these containers are all here - https://github.com/some-natalie/some-natalie/tree/main/website-assets/slimming ↩ ↩2
-
Pretty sure this is how I have Helm installed in my GitHub Actions runners still. ↩
