Building a secure Jekyll container
New gig, new tech stack to learn … let’s do the simple things first! 📚
some-natalie/jekyll-in-a-can : 🧪🥫 - it’s Jekyll in a container on GitHub’s container registry
We’re going to build a container to run Jekyll , the popular static site generator, from one of Chainguard’s containers. My motives here are purely selfish - this website is built with it, then deployed to GitHub Pages. With a local container and the --livereload option, it’ll rebuild locally in a second or two on each file change, allowing me to quickly iterate local before publishing.
The community default container image for this (jekyll/jekyll on Docker Hub) hasn’t been updated in over a year, though. New versions of Ruby and Jekyll have been released, the base image has been updated, and I’m sure quite a lot more. It lights up any container security scanner like a Christmas tree. More important to me, it’s only built for Intel architectures and I’m on an ARM Mac now.
I could do this without a container, but I’d need to either install Ruby locally or push each change, then wait for Actions to build and deploy it, then repeat until I’m happy with it. None of these things bring joy.
Let’s make a new container! 🛠️
Building the container
Jekyll doesn’t have complicated dependencies. This makes picking a base image easy. I’ll need Ruby (latest-ish) and a shell to install a minimal set of gems up front. The shell needs to persist beyond building the container to install any gems needed by the site itself. I want the freedom to mess around in development. Chainguard Ruby latest-dev image gives me that and nothing more.
Since the container runs as nonroot by default and Gem wants to default to /usr/lib/ruby/gems, which is owned by root, we’ll need to set some environment variables to make it work with any gems used by the website.
1
2
3
4
5
6
7
8

FROM cgr.dev/chainguard/ruby:latest-dev

# OCI labels omitted from blog post :)

# Environment variable for system
ENV GEM_HOME=/usr/local/vendor
ENV GEM_PATH=${GEM_PATH}:/usr/local/vendor
ENV PATH=${GEM_HOME}/bin:${PATH}
Next, let’s do a minimal Jekyll install as root, then change ownership of that directory and installed gems to nonroot. The minimal install is only the jekyll and bundler gems and omits the documentation packages by default. Running the cleanup step at the end also helps keep image size down. It’s already a reasonably large image.
1
2
3
4
5
6

# Update gems
USER root
RUN echo "gem: --no-ri --no-rdoc" > ~/.gemrc
RUN yes | gem update --system && gem cleanup
RUN yes | gem install jekyll bundler && gem cleanup
RUN chown -R nonroot:nonroot /usr/local/vendor
The last few parts to getting a simple static site in a container are straightforward. The base image defaults to using /work as the working directory path of choice. We have a shell, so the entrypoint is a shell script to allow for customization of the site by its’ Gemfile. We expose the ports needed for HTTP traffic and live reload, then run the server locally and have it rebuild the site on every change.
1
2
3
4
5
6
7
8
9
10
11
12
13
14
15
16
17
18
19

# Set the working directory
WORKDIR /work

# Copy in the entrypoint
COPY entrypoint.sh /entrypoint.sh
RUN chmod +x /entrypoint.sh

# Now switch back to the non-root user
USER nonroot

# Set the entrypoint
ENTRYPOINT ["/entrypoint.sh"]

# Expose ports
EXPOSE 35729
EXPOSE 4000

# Run the thing!
CMD ["bundle", "exec", "jekyll", "serve", "--livereload", "--host", "0.0.0.0"]
A quick look at the entrypoint script is less interesting than I’d hoped. I put a small help message if a Gemfile doesn’t exist, but apart from that, it runs bundle install on the dependencies before launching the server as outlined in the Dockerfile’s CMD directive.
1
2
3
4
5
6
7
8
9
10
11
12
13
14

#!/bin/sh
set -e

if [ ! -f Gemfile ]; then
  echo "ERROR - no Gemfile found!"
  echo "Check your volume mounts or make sure there's a Jekyll site in this directory."
  echo ""
  echo "docker run -it --rm --volume="$PWD:/work" -p 4000:4000 ghcr.io/some-natalie/jekyll-in-a-can:latest"
  exit 1
fi

bundle install --retry 5 --jobs 20

exec "$@"
… And that’s it. What without helpful hints would really be 3 lines of shell and perhaps a dozen lines of a Dockerfile to build my little Jekyll developer loop in a can. 🧪🥫
Now use it
Change directory to your website’s root directory, optionally remove the prior build’s files, and run it! Connect over TCP/4000 using HTTP (no SSL) in your browser and refresh as needed.
1
2
3
4
5
6
7
8

# remove the prior site's artifacts
rm -rf Gemfile.lock _site .jekyll-cache

# run it, adding environment variables as needed
docker run -it --rm \
  --volume="$PWD:/work" \
  -p 4000:4000 \
  ghcr.io/some-natalie/jekyll-in-a-can:latest
Local development is blisteringly fast on my laptop. This container running Jekyll can rebuild this site from scratch in about a second. For comparison, it takes the default 4 core Linux runner for GitHub Actions about 30 seconds to build.
Once happy with the changes, commit/push/deploy as you normally would. This magic portability is at least half the reason to use a static site generator. 🪄
Vulnerability scan
Now for the vulnerability scan comparison (as is tradition 😊).
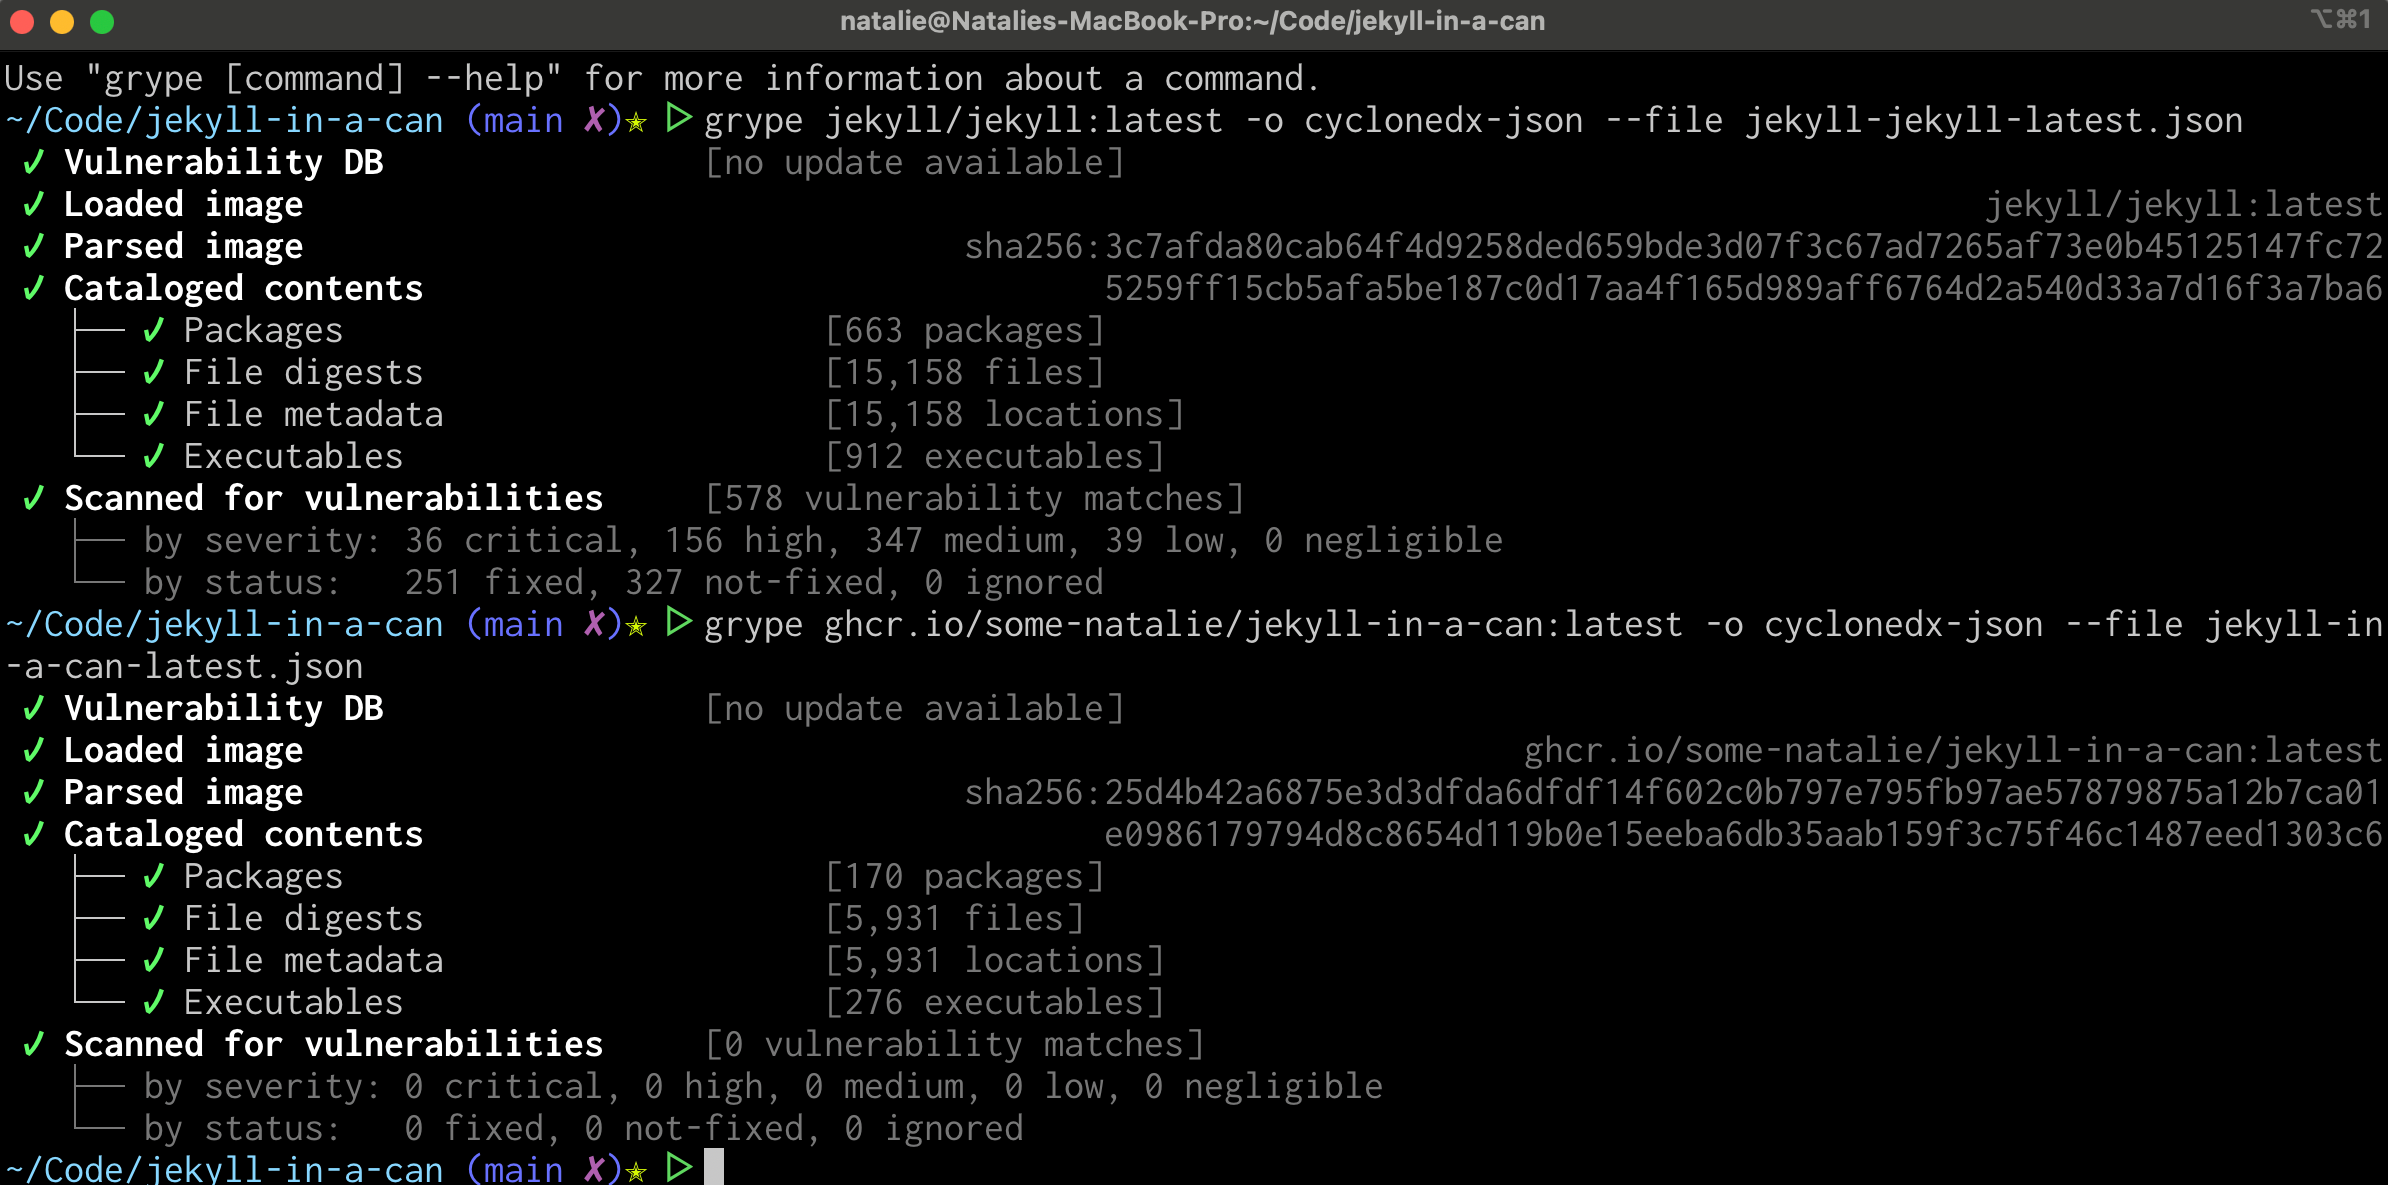
The simple base image swap went from 578 known vulnerabilities to 0. It’s significantly smaller as an image, going from 830 MB to 650 MB, but still quite large. Most of the space is consumed by Ruby, Jekyll, and dependencies. Even though this container isn’t intended to go beyond local development, having a clean vulnerability scan makes using this container in most business environments easier. 🎉
Automate maintenance
Lastly, the repository has some automation to make sure this stays fresh without a ton of effort on my part. It improves overall security by keeping everything up to date, but it also saves some disk space as well. The workflows include:
- Rebuild the images once a week for both Intel and Arm architectures (workflow file )
- Dependabot to keep the workflows up to date (config file )
- Remove untagged images after 2 months and close stale pull requests (workflow file )
Parting thoughts
I built this container to fix my own problems and learn the tech stack and customer journey at my new job. Feel free to use it yourself! It’s open source (GitHub repo ) and the container is public too (GitHub Container Registry ). Without any human input, it’ll stay up-to-date and refer to the Gemfile in your own project for further dependencies. Jekyll is still powerful and simple - and now there’s a pretty simple container to use locally that has some hope to get through corporate IT policies.
Disclosure
I work at Chainguard as a solutions engineer at the time of writing this. All opinions are my own.